[0:00]This tutorial is going to be your ultimate Revit lights and rendering guide. We're going to be covering ceiling lights, wall-based lights, floor-based lights, that all important ambient lighting.
[0:13]And finally, I'm going to be showing you all of the lighting rendering settings that you need to set up in order to make sure that your renderings look amazing. Let's go.
[0:25]Now before we jump into Revit, I would just quickly like to ask you to check out my website Balkan Architect.com. I'm going to link it up just below this video in the description and then also up in the cards above.
[0:37]Uh, that's where you can find all of my Revit courses. So if you're serious about learning Revit, that's definitely the best place to go. Uh, we have over 130 hours of content and we're adding more each month.
[0:51]Uh there are courses there covering numerous Revit topics. There is even a course exactly on this, uh, which is creating lighting families in Revit.
[1:00]Uh now, also there you can find some families. Now in this tutorial, I will be showing you an interior design project where we're going to be setting up the lights. And if you're interested in the families that were used there, there are some really nice, high quality, super realistic, uh, sofa families.
[1:19]So if you want to check out these, uh, highly realistic families, those are available also on my website Balkan Architect.com. Okay, so now without any further ado, let's jump straight into Revit.
[1:30]And here we are in Revit and let's start off with the ceiling lights. So here I have just this kind of an example or demo project.
[1:40]And here what you'll notice is I have this kind of a room. On top, here we have a floor and then here we have just a ceiling.
[1:49]Now, in Revit, ceilings are going to be a separate element from the floor. Usually you you might see on office buildings, projects like that, where you have recessed ceiling and this ceiling is meant to work that way.
[2:04]Uh now, on these ceilings, we can host ceiling-based families. So here if I go to architecture, go to component, I I have a ceiling-based light here, and then I can place that on my ceiling.
[2:15]Uh now, if I were to try to place it here, as you can see, it's just not going to let me do that. It's not going to place it on the bottom of a floor.
[2:24]Now, in a lot of cases, especially in residential architecture, you're going to notice that the ceiling is just going to be an additional layer on the floor.
[2:32]So here if I go into edit type, here on the bottom of the floor structure, I would just come here and insert a layer, drop it down, probably add some thickness, uh, let's say one centimeter or something like that, and then I would call this finish or something like that.
[2:51]And this would be my ceiling. This this would be it. I wouldn't really have anything, uh, apart from that.
[2:58]Now the problem with ceilings like that is you can't really host these ceiling-based families to that. Uh, now there is a solution to that, uh, and I a solution is to use a different type of a family.
[3:12]Uh so here what I'll show you is how to create a family which can be hosted on a bottom of a floor, and that's going to be a phase-based family.
[3:23]So what you want to do is you want to go here to file, you want to go to new, and then you want to go to family. Uh now, here I'm just going to open up the English metric library.
[3:33]Feel free to use Imperial if you want. Now, here there's a lot of confusion when it comes to lighting families because here if I search for lighting, what you'll see is here I have regular lighting fixtures, and then we have some linear lighting fixtures.
[3:48]Uh but both of those, we have the ceiling based, the wall-based ones, and then we just have the generic ones.
[3:55]Now, one way of creating a lighting family would be to use just the generic one. Uh hit open, and then you would basically uh find here the uh the light source. So this is what that family looks like.
[4:08]If I go here to front elevation, this is what that looks like. I usually like to change the light source definition to something like uh this spotlight, hit apply, okay.
[4:20]Uh often it's going to be kind of off to the side, you can easily fix that here, uh by going to the tilt angle and just set it to uh 90 degrees.
[4:31]And I think if I hit apply, yeah, now it's just going to go straight down. Now, I'm not going to explore this too much. As I said, I have a whole course on uh lights in Revit, but what I do want to show you is that now, for example, it's hosted on this here reference plane.
[4:45]You can just bring this down a little bit and then you can create your own uh kind of a uh generic light which you can place pretty much anywhere. Then you would go here to reference level, you would go to extrusion and let's just do something simple like a circle and I'll just do like a 2 250, do 60 mm circle, for example, hit finish.
[5:07]And then let's go to the front view. So it looks like this. Actually let's make it something like 50 millimeters, like that. And also I I like to just kind of extrude it up a little bit here, so it's not going to blocking that light. So we can do it like that. Okay, so you can have like this generic family.
[5:27]I can just save it here, so let's just call it a default or generic light family. Okay, so you can have a family like this, load it into the project, and then what you would do here inside of a project, you would just basically place it wherever you want.
[5:48]Go to the 3D view. So it's placed here. And then you would just give it an offset. So you would say, okay, I want this to be at 280, for example, centimeters, or sorry, that's millimeters. So let's bring it up. Okay, so there, as you can see, now it's hosted here on the bottom of that floor.
[6:10]Now, this is a little bit annoying because you have to work with that offset and then if you change the level height, it's going to give you all sorts of issues. So that would be one option. Something that I find is a better option is to go to here to file and let me show you a better approach.
[6:26]Which is to go to family, but instead of going to those lighting families, so instead of going to these, just go to generic and then go to face-based.
[6:37]Now, if you open this up, the issue is that you don't really have a light source. So when you open up a family like this, and when we go here, let's go to the 3D view.
[6:48]We don't really have a light source here. Now, you can actually create a light source by going here to your family category and parameters, scrolling down a little bit until you find light fixtures.
[6:59]Select that category, and then you want to check light source. Now, if you check the light source on, it's just going to generate that light source, and then you can go here for the definition, apply. Okay, so it's going kind of down and off to the side.
[7:14]Again, we will have to go to family types, and now I'm just going to give it a tilt angle of minus 90 and hit apply. So it's just going to shoot straight down.
[7:26]Uh now, it might seem kind of counter-intuitive to have the light go straight up, but it's actually face-based. So this is the face of a ceiling. So when you place it on a ceiling, it's going to shoot down.
[7:38]Uh then let's go to front elevation here. You should be able to move this a little bit if you want, and then here we can create kind of the geometry for the light, which can be really simple.
[7:50]So let's go here to create extrusion and I'm just doing this really simple. Something like that. Okay, and then this will be kind of 50 millimeters, something like that.
[8:03]Let's go to the front. Yeah, like that, for example. And now we have this face-based family. So now if I save this, and if I call this the face-based light family.
[8:26]What you'll notice here is if I load this into the project, let's go to the same project. Here, you'll notice that if I go to the 3D view, I can actually host it on that ceiling, and it's just going to be there.
[8:40]But you can also host it on a wall, like that. You can even host it on a floor if you want. To take it even further and crazier, if I place a family like this student desk, for example, I can actually go ahead and place my light.
[8:54]So let's see, my face-based light family, I can actually host it on that desk, which is kind of silly, but you can do that. So just something to keep in mind. So anyways, I'm just going to delete this. So I think these face-based families are going to give you the best versatility in terms of where they're placed, because they can be used as wall lights and ceiling lights at the same time. So the same family.
[9:20]Okay, so that kind of brings us uh to wall-based lights. So when it comes to wall-based lights, they're really simple, there is not much to it. If I just go here and search for, I think I have I have this kind of wall-based family. I can just place it on a wall.
[9:37]And that's it. And I think even this is a like a manufacturer's family. And they've modeled that as a face-based family. So you can even host it on a ceiling if you want. So that's just kind of talks about the versatility of those face-based families.
[9:56]So anyways, that's how the, uh, wall-based lighting works. It's kind of similarly simple when it comes to floor-based families. It's actually even more simple.
[10:04]So here I have one. I have this free-standing light. So I can place it here on the floor, but also I can place it here in like the void and it's it's just going to be there.
[10:17]So it really doesn't care. This is just a generic light. It works the same way as this light, where we had to give it an offset. So it basically works the same way. So you can just place it wherever you want, give it an offset if you want. That's really up to you.
[10:30]And if you want to learn how to create this kind of a funky light that casts light into directions, uh that's included in the course. So um I have that course on lighting families.
[10:43]If you want to learn how to make this family and some other families, I'm just going to link that course up in the cards above, and you can check it out there if you're interested.
[10:52]Uh now, also when I'm talking about things that you can check out, uh, this cool, uh, ceiling light, it's actually, uh, designed out of multiple nested families.
[11:03]So if you want to check this out, how to create this, I actually have a full tutorial on how to create this really complex family. So I also that I'm going to link up in the cards above. So check it out if you're interested.
[11:17]And finally, let's talk about those all important ambient lights or ambient lighting. Uh now usually this is done uh with uh some sort of a uh LED light strip.
[11:30]These are really popular these days and I've actually created a family that kind of mimics that. So if I just go here to component and if I go down here, I've created this uh LED, let's see, LED strip.
[11:44]So what this is, it's a lighting family, but it's also a line-based, face-based family. So what does that mean?
[11:51]That means is basically, you just find a surface like this, you set it here to place on face. You click on that surface, and then you extend the line. And as it extends that line, so let's just create a line here.
[12:05]Like oops, it kind of went off to the side, so let me just undo that. So let's try that again. So I'm just going to place it like this, go straight down, click, and what you'll notice is it's just going to uh set uh kind of even intervals of this whole dot.
[12:28]Now, all of these are individual lights, and then this will cast ambient lighting. And you'll want to place it in places like under the kitchen counters, like the upper kitchen counters to have that lighting in the kitchen, or you can place it somewhere in the ceiling or somewhere like that for uh kind of that ambient lighting look.
[12:47]Uh now, this is also something that I explain in the course, so again, just in the cards above. And now I'll go I'm going to be showing you a really cool interior design project where all of these lights come together.
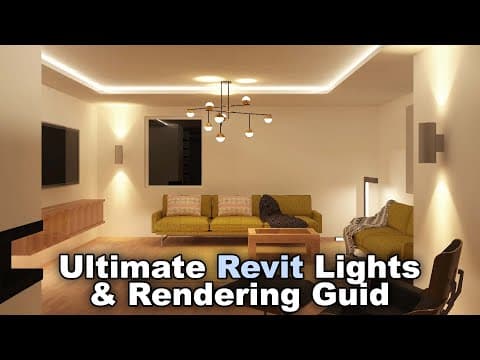
[13:00]So this is an interior design project of my old apartment. Uh now, what you'll notice here is we have all of the lights. We have the the the chandelier here. We have the floor-based light. We have the wall-based lights, and then the ambient lights are here in the recessed ceiling.
[13:17]And then also I've placed some under the this uh TV console, or however you want to call that. Uh now, here on this project, I just want to show you some rendering settings when it comes to lights, uh that you probably need to know about uh in order to get the best effects when it comes to your uh interior uh night renderings.
[13:40]So what you want to do is go here to view and then you want to go to render. That this is going to open up the render dialogue. And the first suggestion that I want to make is that you set the render settings to medium or even draft.
[13:54]Now the reason for that is whenever you have a lot of artificial lights, uh Revit is going to be really slow.
[14:00]Uh it's a lot slower than creating exterior renderings with no lights. Uh so, uh it's just going to take way longer than you probably think. So I suggest going with draft or medium, or even using region renderings uh in some cases just uh to uh just to make sure that uh you're only rendering the part that you want to kind of check out.
[14:23]Now, in this case, I I'm not going to use region rendering, so I'm just going to check that off. And uh next, you want to make sure also that the resolution is set to something a bit smaller for your test renderings. And then once you dial everything in, then you can set this to high, or even best in some cases for best results. And then this you can set to a printer or some high-resolution rendering.
[14:50]So that's just in terms of your computing speed and rendering speed or rendering time. Uh now, here we have the actual lighting settings. So here, if you're rendering an interior scene and you don't want any light coming from the outside. So it's kind of completely dark.
[15:03]You want to make sure to set it to interior and then artificial only. You can also use sun and artificial. Uh now, the reason why we have this interior and exterior options is mainly for the exposure settings.
[15:19]The interior artificial only or just any of the interior ones are going to give you uh kind of a uh exposure settings that benefit an interior uh kind of a night rendering with lights.
[15:33]So that's why you want to go with that one. And then finally, something that's most important is the artificial lights menu. So when you open this up, it's going to look like this, and it's just going to give you all of the artificial lights in this view.
[15:45]And then uh if you expand this group, see, what you'll have is basically all of the lights. Now, the reason why it shows so many of these, so there's like 200 or 150 lights here.
[15:56]The reason for that is because the LED light or the LED light strip, every dot that you see here or that's used is is an a separate light. So that's why it appears like this.
[16:09]Uh then here we have the the free-standing light and then also here I have something else. We have yeah, this is the light strip also. Here we have the the these lights here, the wall lights. But what you'll notice is that we don't have this ceiling light. Well, the reason for that is because this ceiling light is actually categorized as a generic model.
[16:31]Now the reason for that was uh it used nested lighting families for lights, so it didn't really need lights or or didn't need kind of a light source of its own. So that's why it's categorized like that, but if you want this to appear inside, you would have to go here into edit family.
[16:50]And then you would have to change the category by going here to category and then you can set it to lighting fixtures. Uh now also here for the light source, you can check that on. In this case, I don't need it, so I'm just going to leave that checked off.
[17:05]But the category is going to be light fixtures. And then we can just load it back into the project with the different override or the different category. Okay, so let's now go back to our rendering settings.
[17:19]Now what you'll notice here is that I have different values for dimming. So what dimming does is basically it, well, as it kind of as the name would imply, it dims the light. So you're going to have to kind of play around with this and kind of change the dimming settings in order to dim uh specific lights if they are a bit too bright.
[17:42]So basically you enter anything between 0 and 1. So for example, for the free-standing light, I went from for 0.5. And then for all of the LEDs, I went for 0.15. And if you want to change multiple ones, you just select one here, hold the shift key, select one down. And then you can just change that to 1.5, for example, hit enter and it's going to change all of them.
[18:05]In this case, let's just leave it at 115. Okay, so uh we can also group the lights. So for example, here I can uh go and I can select multiple lights like this and then create a new group.
[18:18]Uh and then those would be grouped under uh kind of a the different light and so on. So you can kind of play around with groups. Uh in this case, I'm just going to leave things as is, and then that was kind of pretty much all of the uh the settings that we need for uh setting up the artificial lights and for dimming.
[18:37]So now let's do a quick rendering and then I'll just show you kind of a few final settings. I'm just going to click here on render, and then we'll wait. And this is the resulting rendering. Uh now, if you go here to adjust exposure, you can kind of play around a little bit.
[18:52]So for example, here this exposure value, that's what's different from kind of the the interior artificial only renderings and exterior uh sun-only renderings. So you can make it a bit darker or brighter depending on what you're trying to achieve.
[19:10]So this is kind of instead of having to use Photoshop, you can kind of play around here. You can make the lights uh a little bit more gray or intense uh or the the the the saturation, see.
[19:23]Uh also here you can make it a bit cooler if the rendering's a bit too warm, or you can make it warmer if it's a bit too cool. So you can play around here with the settings. And finally, once you're done, you can just export or save to project.
[19:36]And here we can see the results. We have that ceiling light casting some light here on the ceiling and on the floor. We have our floor-based light here in a corner. Uh we have these wall lights. We have that ambient lighting up on top and below the shelf casting the light down.
[20:03]Uh so, uh with kind of a combination of all these lights, we have a really impressive interior night rendering. Now, if you want to get this Revit project file, uh you can find that on my Patreon page.
[20:08]That's where you can find all of my Revit project files. I'm going to include the link to that just below this video in the description and then also up in the cards above. Thank you for watching, guys. Make sure to check out my website Balkan Architect.com for more Revit courses. There I have over 120 hours of content and I'm adding more each week. Make sure to subscribe for more videos and also I've added a video over there that might interest you as well.


