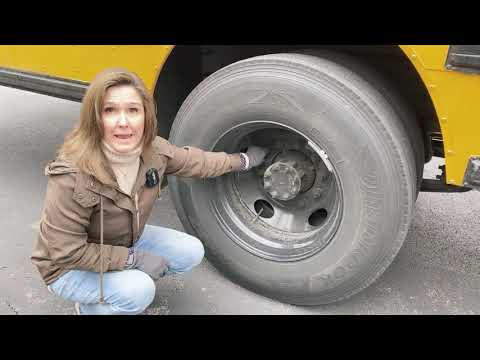
[0:02]Hi, I'm Tracy Malti with Centerville City Schools in Ohio. We're going to do a pre-trip. I want to demonstrate what you'll need to do to complete the CDL portion, pre-trip portion of your CDL exam. And I'm going to go in a pace where what I would do if I was taking the test myself. So if you need some additional time or if you need some additional explanation, I will put the links to my two training videos in the comments. They go into greater detail about where the parts are located on the bus and uh it's it's in a slower time frame. So if you need some additional assistance to go through the pre-trip, try looking at one of those, that may be some additional help for you as well. So, here we go. This is what you'll need to do to complete the pre-trip portion of the exam. You've got 30 minutes to complete it. It can be done in any way as long as you complete that pre-trip in those 30 minutes that are allotted. I like to start at the top. We have our amber clearance lights, our amber warning lights, our red loading lights, our amber clearance side markers. We have our amber turn signals and hazard lights, our high headlamps are clear and high beams are clear as well. They are all the proper colors, they're not cracked or broken, loose or missing. I want to see that my bus is not leaning to the left or to the right, that might indicate a suspension problem. There are no leaks or puddles of any kind, no oil, fluid, coolant, power steering fluid. None, no leaks. I'm going to check all of my mirror brackets, that they're bolted and mounted securely, not cracked or broken, loose or missing. I'm going to do both sides, checking the hood latches in addition. Nothing is cracked or broken, loose or missing. I'm going to pull the down. I want to start on this side. I'm going to start with my alternator. My alternator is belt driven, it's bolted and mounted securely, it's not cracked or broken, loose or missing. This is the serpentine belt. If I push on it, it will not deflect more than a half inch, it's not twisted or frayed, cracked or broken. The alternator is again, is belt driven. The water pump is down this direction. It's not cracked or broken, loose or missing. It is also belt driven and it is not leaking. It's bolted and mounted securely, not cracked or broken, loose or missing. Moving on, I've got my front and rear spring mounts. They are bolted and mounted securely, not cracked or broken, loose or missing. I've got my shock absorber that's bolted top and bottom, not cracked or broken, loose or missing. It is not leaking. I have my torque spring and my leaf spring. They are not shifted, cracked or broken, not loose or missing. The U-bolt right here is bolted and mounted securely, not cracked or broken, loose or missing. I have my ABS line and my brake line. They are not kinked, they are not leaking. They are securely attached, they're not cracked or broken, loose or missing. They are attached securely to the brake chamber, which is clamped securely. It's not cracked or broken, loose or missing. I also have my push rod and my slack adjuster. They are not cracked or broken, loose or missing. If I were to tug on the slack adjuster, it would not, I would not be able to move it more than one inch. As I'm looking at my brake cover, which is covering up the brake pads or brake linings, the brake linings are not worn thin and the brake drums have no grease, oil, holes, or debris. The outside and inside of my tire has no abrasions, bulges or cuts. The tread depth is 4 30 seconds, evenly worn all the way across. Again, there's no abrasions, bulges or cuts, the front or face of the tire. The rim has no welds other than factory and it's not cracked or broken, loose or missing. All of my lug nuts are in place and tight. They are bolted and mounted securely, not cracked or broken, loose or missing. The hub oil seal is in place, bolted and mounted securely, not cracked or broken, loose or missing. The oil the level of fluid inside is an adequate level. The valve stem is straight, centered, has a metal cap. If I were to check the tire pressure, I would use a tire pressure gauge. This is my mud flap, it's bolted and mounted securely, not cracked or broken, loose or missing. We also have our windshield washer container. Cap is in place, bolted and mounted securely. The hoses are in place, there's an adequate level of fluid, not leaking, not cracked or broken, loose or missing. We're going to go to the other side now. I'm going to check out all of my wires and lines. They are all attached properly. They're not uh cracked or broken, loose or missing. I'm also going to check all of my hoses. All of my hoses should be attached properly. None should be kinked or leaking, not cracked, broken, loose, or missing. This is my coolant level reservoir. My cap is in place, the hoses are connected properly. The level is at between add and fill. It's not cracked or broken, loose or missing and neither the hoses or the container are leaking. My oil dipstick, if I were to pull it out, put it back in, wipe it off, reinsert it, take it back out again, it would read between add and full. I'm going to take a look at my air compressor. My air compressor is back there. It is gear driven. It is not cracked or broken, loose or missing. It is bolted and mounted securely, and it is gear driven and it's not leaking. This is my power steering reservoir. My power steering reservoir is bolted and mounted securely. The hoses are in place, not kinked or leaking. The cap is in place. I would check the this cap and uh dipstick the same way I check the oil. Take it out, reinsert it, wipe it off. Look at it again, it would read between add and fill. If I follow the hoses down, it would go to the power steering pump. The power steering pump is also gear driven. It's not cracked or broken, loose or missing, and neither one is leaking.
[7:07]I'm going to take a look at my steering column which is attached to my steering gearbox. My steering gearbox is bolted and mounted securely, not cracked or broken, loose or missing, and it's not leaking. I'm and the hoses are attached securely, not cracked, broken, loose or missing, and they are not leaking. I also have my pitman arm, my drag link, and my tie rod. Tie rod is down there, it's the bar that goes across. They are bolted and mounted securely, not cracked or broken, loose or missing.
[7:44]I would check the brakes, the suspension and the wheels the same on this side as I did on the other side. I'm going to take a look at my service door. My service door is in place, glass. The seal is in place, not cracked or broken, loose or missing. I'm going to take a look at my grab rails. They are bolted and mounted securely, not cracked or broken, loose or missing. My step tread is not lifted to pose a tripping hazard. It's not cracked or broken, loose or missing. My step lights are clear. They are the proper color, not cracked or broken, loose or missing. I'm going to take a look at my DEF tank, which is right here. The DEF tank, neck, cage. They are all in place, bolted and mounted securely, not cracked or broken, loose or missing, and nothing's leaking. I've got my school year sticker that is up to date. I have got my reflective tape and my reflectors. They are amber before the duels and red after. The tape is not cracked or broken, loose or missing. My clearance lights are amber before the duels, red after and my turn signals and hazards are amber. They're not cracked or broken, loose or missing. I'm going to take a look under the bus, this will be a little harder for you to see, but we're going to talk about a few items here. So we want to first talk about our frame and cross members. Frame and cross members are not cracked or broken, loose or missing. They are bolted and mounted securely. We're going to take a look at our uh exhaust system. The exhaust system is bolted and mounted securely, not cracked or broken, loose or missing. If we would see a soot pattern, that could indicate a hole and if we turned our bus on, we would listen for excessive noise. The other item we're looking at is the drive shaft. It's straight. Uh the universal knuckle and joints are also not overly worn. They are not hanging on the U-hangers and everything is bolted and mounted securely, not cracked or broken, loose or missing. We're going to take a look across the way. We want to take a look at our brake linings. behind the dust cover and we want to take a look at our brake drums. Harder to see but we can see them a little bit on this side. We want to make sure that the brake linings are not excessively worn and the brake drums have no grease, oil, holes, or debris.
[10:39]We're going to take a look at our front and rear spring mounts. Here's the front and and rear spring mounts. They are not cracked or broken, loose or missing. In place with the bolt bushings and they are attached securely, mounted securely, not cracked or broken, loose or missing. We also have our U-bolts in place. The U-bolts are bolted and mounted securely, not cracked or broken, loose or missing. We also have our push rod and slack adjuster, not cracked or broken, loose or missing. If I were to tug on that slack adjuster, it would not move more than one inch. I've got my buddy wheel here. It is evenly spaced but has no spacer and there is nothing between my duels. The rear duels are evenly spaced all the way across. There's no less than uh 2 30 seconds tread evenly worn. The inside and outside of the tire have no abrasions, bulges or cuts on them. The rim has no welds other than factory, it's not cracked or broken, loose or missing. All of my lug nuts are in place and tight. If one was loose, we might see a rust trail or a shiny pattern. Same in the front. I'm not sure I mentioned that up front, but that would also be the case up front with the tire. This is the axle seal. The axle seal is bolted and mounted securely, not cracked or broken, loose or missing. It's not uh there's no leaking or you would see a spray pattern or splatter pattern. Same with the um the hub oil seal up front. That would also have a splatter pattern in the same way if it was leaking. Okay. We have our valve stems, inner and outer on the tires. They have metal caps, they're straight, they're centered. If I were to check the tire pressure gauge, I would use a tire pressure gauge to check the pressure. Okay. This is my um mud flap, bolted and mounted securely, not cracked or broken, loose or missing. A few other things that I need to point out back here. Suspension. I have my shock absorber that is bolted top and bottom, mounted and bolted securely, not cracked or broken, loose or missing. I also have my air bladders and the air bladder mounts, spring the uh air bag mounts. They're mounted top and bottom, not cracked or broken, loose or missing, and neither one is leaking. I also have my torsion bar, which is very hard to see. But it's up there and appears to be functioning normally. As we're down here, we're going to take a look at our fuel tank and cage. Uh they are bolted and mounted securely. Nothing's leaking down here. We're also going to take a look at our cap. Cap again, neck and and the cage are all in place, bolted and mounted securely, not cracked or broken, loose or missing. All of my windows are in place, nothing's cracked or broken, loose or missing. My uh reflectors in the back as I stated earlier.
[14:38]Behind the duels are all red. Our reflective tape is in place in the back as well. We have red clearance lights, amber warning lights, red loading lights, clear backup lights, red brake lights, red tail lights, amber turn signals and hazard lights. They are all bolted and mounted securely, not cracked or broken, loose or missing, and they are all the proper color. I'm going to take a look at my emergency door. Lights come on, the buzzer sounds. The door locks into place. The seal is in place, not cracked or broken, loose or missing. When I release the door and shut down the handle, everything turns off. I would check this side of the bus exactly as I checked the other side. In addition, I would add the stop arm. The stop arm is bolted and mounted securely. All of the reflectors are the right color, red, and you'll see momentarily that it is functioning properly.
[16:30]I have the circuit breaker. This is a circuit breaker bus. There are no additional fuses. There is a battery box. There are three batteries. The tray and pins are also in place.
[16:47]There's no excessive corrosion.
[16:53]All right. We're going to head on the bus now.
[17:15]Talk about some emergency equipment.
[17:21]I've got my body fluid cleanup kit. It is fully stocked. My first aid kit has 24 dry box bandages, proof of insurance, and three emergency contacts. I have my uh three reflective triangles right there.
[17:55]All right.
[18:03]I can see that all of my mirrors are adjusted for me.
[18:19]My student year, my visor and mirror are bolted and mounted securely, not cracked or broken, loose or missing.
[18:37]My windshield is in place, has no decals or stickers. I'm going to do a safe start. I'm going to put my seatbelt. My seatbelt latches securely. It's not twisted or frayed. Latches properly. I'm going to do a safe start. The safe start means the parking brake is set, the gear shift is in neutral. As I turn the bus on, I can see that my ABS light goes on and once it recycles the computer, it goes out. Okay. I'm going to turn my headlights on, so it illuminates the gauges. Okay. All right. Now I'm going to tell you about my gauges. This is my front and rear air brake gauges. They will sit right around 120. When they hit 125, the governor will come, kick on and you'll hear a swish noise of the air, okay? We have our voltmeter. The voltmeter will sit between 12 and 14. Have ample fuel for this trip. Our speedometer, our tachometer, our odometer. Our water temperature gauge will rise to about 190. Our depth gauge has ample fluid and our oil gauge will sit between 40 and 60. And transmission will also reach about 200. All right, I'm going to show you the inside indicator lights. Left turn signal, right turn signal, hazard lights, high beam indicator.
[20:53]Horn, wipers and washers.
[21:13]The reverse audible sound, and it goes smoothly through each gear.
[21:30]We have our fans, high, low, and off. Have my step well heater and driver heater and defroster. Both are functioning, high, low, and off. Mid-ship and rear. I can hear high, low, and off. Heated mirror, strobe light indicator, driver dome and passenger dome indicators and lights. I have my uh warning amber warning lights right here, indicators. And I have my override, my red override, red flashing lights, and my stop arms coming out. Okay. Now I'm going to now that I've showed you all of my gauges. I'm going to show you a series of brake tests. The first brake test that I'm going to do will be the parking brake. I'm going to apply the service brake, put the bus into gear with the parking brake set. I'm going to push on the accelerator and we're not moving left or right or any direction, so we know that the parking brake is holding. Now I'm going to release the parking brake and take my foot off the service brake. Go forward approximately five miles an hour. Push on the service brake. I want to make sure that I'm stopping smoothly and I'm not pulling to the left or to the right. Now I'm going to push, put the bus into neutral. I'm going to turn the bus off, but put it to accessory. I'm going to make sure that without any pressure on the service brake, that I'm not losing anymore than 2 PSI in a minute. Would you like to time that? You're going to ask the tester and they're going to say yes or no. And uh wait until they say yes or no before you move on. Once they say move on, you're going to push heavy pressure on the brake. After the initial drop, it will not lose more than three PSI in a minute. Once again, you're going to ask if the tester would like to time it, and they can time it up for a minute. Uh when they tell you to move on, so the last series of break tests, you're going to fan the brakes.
[24:52]Above 55, the light and buzzer will sound on your air tank gauges. As it just did. Continue fanning the brakes and between 20 and 40, the parking brake will set. As it just did. Okay, so we know that all of our emergency features are functioning properly. I'm going to restart the bus. We already know that it's in safe start. Parking brake is set, gear shift is in neutral. Okay. I'm going to now check the rest of the inside cabin. As I show you my driver seat, it's bolted and mounted securely, not cracked or broken, loose or missing. I'm going to check each of my seats as I go back that the seat cushions are attached securely to the frames and the frames are bolted securely to the bus. And I will pull up on each of those as I go back.
[26:19]I'm going to stop at the emergency exit. It opens smoothly. The lights and buzzers sound. I close it off, it turns off. I would check the other three window exits the same way. And continue back and stop at the emergency exit. I'm going to show you the strobe light. It's clear. It's not cracked or broken, loose or missing, functioning properly. I'm going to engage my hatch. It opens properly and the lights and buzzer came on as you saw. And when I close it up, it all turns off. Continue checking seats. They are all locked. I'm going to check the functioning of the door from the inside. The lights come on, the buzzer sounds. That all goes off when I shut the door down. I'm checking the seat backs as I return. I would check the other roof hatch as I checked this one. And like I said before, the other windows as I checked that one. At this time, I'm going to have my examiner go and check all of my outside lights. I would have them check the clearance lights all the way around. I'd have them check the amber warning lights, the red loading lights, the turn signals and hazards on the side, and as I said before, clearance lights all the way around. In the back, the amber warning lights, red loading lights, the brake lights, the tail lights, the reverse lights, turn signals and hazards in the back. I'm on the passenger side, I would have them turn check the turn signal and hazards and the step well lights. When your examiner gets off the bus, they will probably have you turn the bus off with your window open and you will point to what you are testing. Say say and point to the lights that you are testing at the time. When you're done, they're going to get back on the bus and ask if there's anything that you may have forgotten. And I believe I forgot to point out the six fuses that are right here. You have that opportunity. If you have more time left. So think about what you may or may not have said. And take that time to think about what you may have missed. If you can think of something that you missed, you have that opportunity to tell them about it. If it's something on the outside of the bus, you will need to get off the bus and show them. If it's in the bus, just take take that time and do it at that time. Okay. All right. Now you're ready to move on to maneuverability.


