[0:00]Hello again, I'm going to show you my method for drawing meadow grass.
[0:08]Grass is something that I've found tricky for a long time and this time, hopefully, it's going to work out. I'm starting off with a layer of cream. I'm using polychromos pencils on Bristol Vellum. You can see some little yellow dots there, that's actually masking fluid. It was supposed to stay there to mark off areas for little flowers that are going to be in the grass later. Unfortunately, you can see as I work, a lot of the little dots just vanished and flipped off. That's okay because I figured out another system for putting them back in anyway, so I'm not too concerned about those at this stage.
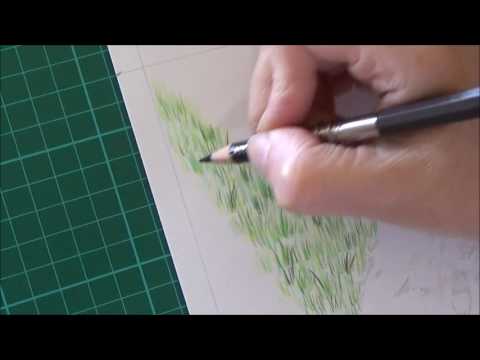
[0:47]What I'm actually doing is small scumbly sort of strokes. I'm keeping the direction of my pencil and mainly up and down to follow the grain of grass, but I'm not being too neat. All I want to do is put in a rough layer, not pressing overly hard, but just a rough layer of strokes to give um get rid of some of the white that will be underneath otherwise. There'll be plenty more layers to go over the top of this cream. Some parts of this video I'll fast forward through, just so that uh you don't get too bored, and other parts I'll try and keep in real time so you can actually see what I'm doing.
[1:49]The next layer is with Cadmium Yellow Lemon. This time, I'm keeping the strokes more upright. I'm putting in a few harder strokes that will show through when I do the darker layers of green later on. Again, I'm not pressing overly hard on all of it, just the few that I want to indent to leave marks.
[2:42]And here you can see I'm putting in a few more definite strokes of grass, pressing on a little bit more firmly, so that they'll show through when I add layers later on.
[3:20]The next color I'm adding is Light Phthalo Green, which is quite a bluey shade, but on top of the Cadmium Yellow Lemon, it goes to a lovely shade of green, and we'll just brighten up some of the deeper areas as the blue peeps through.
[3:48]Again, I'm using it to go over some of the strong strokes that I made with the Cadmium Yellow Lemon to pick out the grass grains. I'm not, I'm trying not to work in lines because I don't want the grass to all be formal. I want it to be rough meadow grass, different lengths and different tufts all over the place, so I do tend to dot about a little bit.
[4:47]Now I'm using the layer of light green to help blend in and cover some of the whites, another shade to help make the grass look more realistic.
[5:52]Now I'm using Permanent Green Olive to really deepen the darks up and add more definition to some of the leaves of the grass.
[6:25]It's important to keep your pencils nice and sharp or to keep turning them as you're using them so that your blades of grass all stay similar.
[6:44]As you can see, I'm dotting about all over the place so that I don't work in straight lines. I much rather keep it a little bit more random. If it was a lawn or something, it'll be a bit different because this is meadow grass, you need it to look a little bit more muddly.
[7:56]Next, I'm going in with some dark indigo. This will be quite dark, it will end up um really deepening in some of the areas and it also adds another subtle tone instead of just having all just green.
[9:00]The next stage is to go over everything with permanent green. This time, I'm going over it with strokes. I'm still not filling it in totally, I'm doing strokes, but I'm not trying to take out all of the white bits. It's important that you keep the blades still looking like blades of grass rather than just coloring in over all the work that you've just done. But this will start to make it all look more finished, more blended together.
[10:06]I'm still working with small strokes so that the um permanent green will still give the effect of of grass blades rather than trying to color it all in.
[11:13]Now for another layer of Cadmium Yellow Lemon, which will bring color a bit brighter again. It looks like there's lots of layers, there's still more to do, but the whole of this section um actually took me 20 minutes. So it's not so bad, it's um quite relaxing.
[12:16]We're back in with another layer of, I think this one is grass green actually. I think I'll use grass green then, just to deepen up some of the shadowy areas. Yeah, it's the grass green, slightly darker.
[13:14]There are methods of speeding this up. I've seen it done with um mineral spirits, which is fine. I'm I've tried blending it with mineral spirits as well, but I quite like this way as it still gives more of a a grassy grainy effect. You can still see bits of the paper through, which is really what I want for this one. If I was going for a more completed piece, more um, if I wanted total coverage then I would probably have done a layer of mineral spirits before I started repeating all of the colors over again and that would have totally covered all of the white in. Now I'm going back in with a layer of um, permanent green olive, and again working on the dark areas. Even if I had used the mineral spirits, I'd have gone back over with these layers again now to add more definition. And there's the dark indigo.
[14:07]Um, but you wouldn't have so much white showing through in the paper if you'd have if I'd have used the mineral spirits.
[14:44]He's purely a matter of taste and what you think you'd prefer for the picture. This drawing is still going to be quite a bit of white background, so um, I'm not really wanting this to look quite so polished as I would do if I was trying to cover the whole of the paper with grass.
[15:47]This is meadow grass, so it doesn't matter that it's all a bit patchworky and not quite as smooth as your normal front lawn would be. I can get away with quite a few rough areas on this, it hasn't got to be neat. The whole beauty of meadow grass is that it can be various different shades and tufts.
[16:46]And that's it. Here's the photo of where I am so far. Um, I'll finish doing the rest of the grass in front of the dog and then probably touch up everything just to tie it all in. But I'll let you see how I get on with that, and of course, I'll show you how I add some flowers later on.


