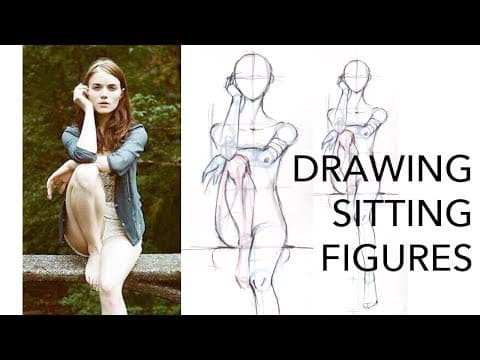
[0:00]Hey, hey, party people. In this video, we are going to go over sitting figures, like these, okay, on chairs, on stools, propping their butts on chests of drawers, etc. And with sitting figures, the biggest difference in terms of what you have to pay attention to between sitting figures and standing figures, it's really in the lower body. I mean, upper bodies, they're going to be sitting up straight up or slouching or what have you, like you do with standing poses. Sitting poses, you're going to pay attention to the changes in the legs, and the two big things are foreshortening. Okay, foreshortening is when the angle is coming towards you. So, these legs are coming towards us, so they're they're foreshortened. And muscles moving around with legs folded over. So with this, her legs are uh crossed. And so her gastrocnemius, all of her calf muscles are kind of squished over to one side. When you have a pose like this, she's so like precisely posed that, you know, you barely see her calf muscle like squished into her knee there. But that's because her leg really isn't fully crossed on the other leg, like this one is, this thigh is resting completely on the other thigh. Okay, really quick, let's go over my materials. I have my visual references. I'm going to use tracing paper today. I don't have a brand preference for tracing paper, as long as it is not like too plasticky, Vellamy, but more like paper, more matte. I have my mechanical pencil. I have my two favorite erasers, my Pentel Clic for big erasing, my Tombow Mono for detail erasing, and a couple of Pilot Color Enos. These are mechanical colored pencils, and I love these to do corrections work. Clear graph ruler and masking tape, some kind of tape that's not particularly sticky. Doesn't matter because I put lint on it anyway, that way I can peel it up later, really easily. I'm going to show you how I to do this figure using my four-step croque building process. Now, I have a video series on that. I have a series for women, a series for men, and if you want to go and watch those, they're very in-depth. They're made for beginners. If you are a beginner and are learning croque drawing from scratch, I suggest you go watch that series. Okay, I'm going to move a little bit quickly with this particular one. Okay? Now, I have videos on how to do this for not elongated figures and elongated figures. So, at this point, when you have your visual reference, you need to decide, okay, do I want an eight-head figure, nine-head figure, ten-head figure? Okay? Let's say I want to do a ten-head figure on this. Right? The first thing you need to do is measure the head. You want to measure along the center of their face, and if you can't tell where the top of her head is because she has some floopy hairstyle, just keep in mind that the center of the eye is the center of the whole head. Not the center of the face, but the center of the whole head. So, she's at half in a 16, so this is a one and one eighth inch head. I'm going to do is I'm going to flip my paper over. I'm going to draw my plum line. I always put the head line, the plum line on the back so that when I'm drawing and erasing here, I don't lose my number line. And I'm going to do a ten-head figure today because it's the most difficult, uh, and so I like to demo the harder ones and then you guys can do the easy ones off of that or easier. So, I'm going to mark her pelvis in here. I'm using just a white pencil so I can see what the hell's going on. There's her pelvis here. There's her center front, and so I'm going to follow this line and there's her center front. And there's her side. Okay, that's kind of how her side seam would sit if she were wearing pants. That's the base of her neck, kind of the base of her pelvis. I'm going to say that's about where her plum line is, her center of gravity for the way she's sitting on the chair. plum line. The one mark is right at her chin. Trace the head. There's the center line for her face. There's her ear. So that's mark two, and the two mark is the top of her breast where a strapless dress would sit, and her breasts are kind of like right there. That's one breast, that's the other breast. There's her shoulder, shoulder balls. Mark the angle of her neck, angle of her shoulders. Okay? And then here's the three mark, and you're going to scooch that up to where her waist is. There's her rib cage, there's her side seam, and then when we mark the waist, we mark the elbows. And we always mark with the full width of the joint, so you could figure out high, how wide each joint and limb is going to be. And then with women on a four, on a ten-head figure, bottom of the hip is four and a quarter. So, we're going to scooch that up to the bottom of her pelvis. Line that plum line back up again. Now we mark the wrists. And yeah, the angle's going to be thrown off a little bit because you're elongating everything. This is the tricky part where we start doing the legs. Now, normally on a standing figure, the center of her knee would be at six. If that's her thigh, that would be the length of her thigh on a standing figure. So, what I would do is I would take the center of that, which is about here. The measurement is to here, the center of her knee, that is two and three-eighths. This leg has no foreshortening, I will follow the angle of this, two and three-eighths. You're like, holy crap, that is really far, and it's like, well, yeah, it's a ten-head figure. So, we're going to put that there.
[8:29]And there's the width of her ankle, there's the angle of her leg. And then we're going to put her foot in here. I'm actually going to make her foot a little bit bigger because the rest of her is so big. Now, she's wearing a bit of a platform, but I'm going to pretend that that's her complete foot. And then here, back to where her knees were. And now our plum line is off because our legs are so much longer, but make sure that the plum line is parallel. Okay? Don't angle it in weird ways, but make sure things are lined up. One, two, three and three-eighths. There's the center of her ankle.
[9:17]And there's the pose elongated to a ten-head stance. Now, if you follow my four-step croque building process, then you know step two is building out the figure. Step three is adding the anatomy. Step four is perfecting and modifying to fit my customer. So, please go watch those videos if you are interested in really working on your fashion figure. Really quick, I'm just going to flesh out and correct this figure. I think that her neck is too short, and she's like holding her shoulders really high and stiff. So, what I'm going to do is I'm going to raise her head. I'm not going to make it bigger. I'm going to raise it and bring it forward a little bit. And I'm going to drop her shoulders a hair, just so she looks a little bit more relaxed. There's her suprasternal notch, there's your Roger. I'm going to drop her breast a tiny bit, just so she looks a little bit more relaxed, right? Deltoid, her brachio.
[10:43]You can't really see because she's wearing uh, this dramatic skirt, but it only makes sense that someone's butt gets flattened because they're sitting. Okay, there's that muscle and fat compression thing again. So, if she were standing, her butt would be nice and round like that, but because she's sitting, I'm going to flatten her out, just a little. There's her knee, there's the top of her, give her a little bit of that top of thigh muscle, and that hamstring that drops. And then this is going to be flat and flush to the stool that she's sitting on. And then there's her knee cap. And we're going to fix that squish. We're going to get in there, and we're going to squish this in. We're going to move the knee out. And we're going to squish that a little bit. Always address the squishes. That's going to be the newism. Address the squishes.
[13:43]Flatten that. And there is your ten-head sitting figure. If you are more comfortable kind of looking at a visual reference and then kind of drawing on your own, you can do that. I'm going to do a nine-head figure for this one, just for variety's sake. So, I'm just going to look at this one and then transfer it to my own figure. Okay? Since it does help me give proper fashion figure proportions to have a number line, I'm going to have one here. You know, something like this. I would mark the center. So, here's her, her face, her head. Center is her eye line. She's looking full frontal. There's no angle here, so I'm going to put her ears in there. There's the center of her head. With the nine-head figure, the proportions are the same as a ten-head figure, except with a slightly shorter. Okay, a lot shorter calf. I mean, nine, not a lot of people in the world are nine-heads, but nine-head bodies do exist in nature, and so it does it looks very fashionable without it looking too exaggerated. You know, there are a lot of supermodels, Giselle, Nadia Arman, they are literally nine-head figures. The two again is right at the top of the breast. And her torso is real straight. She's not twisting one way or the other. Her shoulders are pretty straight. So, we're going to keep those breasts in there. We're going to double-headed Mickey Mouse, and there's the angle of her shoulders. I do breasts and then shoulders. Because I know that breasts are going to sit right under that two mark and then shoulders are going to sit proportionately above that. With some poses, like this one, where she's really pushing her shoulders back and trying to give a very upright posture. You're going to see a separation in that double-headed Mickey Mouse. Here's that, and here's her shoulder ball. And it's also three-quarters, so there's some of that, but a lot of these more frontal views, you are going to see that double-headed Mickey Mouse look. Waist is at three, there's her rib cage. Four and a quarter to four and a half is where the bottom of her pelvis sits. And again, you know, it's going to be flattened some. It's flatter here because it's squished. This doesn't look flat because her thigh is being raised, so it's not like her fat is sitting on the little uh, what is it, fence post? Okay? So, this part is relaxed. This part is more coming right at you. And generally speaking, your shoulders are the widest part, then your hip, and then your breast. Generally, of course, you can modify for your customer, for your illustration, etc. We're going to draw the arms last because they're in proportion to her leg. Her breast is like in here, right? And her knee is overlapping her breast a little bit. So, I'm going to take my red pencil and I'm going to mark that up here. That's where her knee is. Kind of straight up and right in front of her breast. Her ankle is, her calf is tucked in. Her ankle is right in front of her crotch, tucked right up against her other thigh, and at the bottom of her hip. So, there's her ankle. So, that's, and then her foot is straight down, very little foreshortening, like that.
[17:38]In relation, this girl's other knee is right at the toes of her other leg. So, overlapping that plum line a little bit. There's her knee. There's her calf, and that's how you know how much to foreshorten that leg. I still have my number line. Normally on a nine-head figure, the knee, the center of the knee would be at six, and then the center of the ankle would be at eight. But since right now it's at five and I want a nine-head proportion figure, I'm going to move the ankle down to the center of seven. And her leg is coming out at an angle a little bit, so that's why it's out here like that. And then we have this calf and then her foot hangs with very little foreshortening. Like that. And then her arm. So, this elbow is sitting on top of her her knee, but off to one side a little bit. So, we're going to put that there. And that's the foreshortening, super foreshortened. And then her arm, her wrist is sitting, it's not squishy. You notice she's not, you know, resting her head on her hand. It's just kind of coming up to touch her face a little. So, her wrist is out here, and then we're going to, you know, work on her hand later on. I have a whole video called how to draw hands, and that's how that arm is going to sit. And then this elbow is going to be a little bit lower, a little bit lower, and not touching, the arm is touching the knee, the elbow is not touching the knee. And do you see the center line? The elbow is just on the other side, so we're going to do that. Use all these markers and proportions to help you. There's her wrist. Do you see how it's like right there, right in this little bubble? Okay? So, her wrist is right there, almost aligned with the outside of her shoulder, almost, almost, right? So, her arm is in there, tucked in there.
[20:04]And then her hand, seriously, go watch that how to draw hands video where I go over making sure that you draw the back of your hand as opposed to the front of your hand for these kinds of things. So, there's that, and that, and that. There's her elbow sticking out. Is her shirt had stripes? They would sit like that.
[20:54]Super round cuz they're coming right at you. You're going to see all of that knee stuff articulated because the skin is stretched over the knee. And your thigh is going to flatten and curve out. And you're going to see the calf muscles bulge out.
[22:01]And again, there's her knee cap in there. And then this is all kind of smooth cuz it's hanging without things touching and shoving and. Oh, that's a terrible looking leg, excuse me. Let's try that again. Ankles too big. Ah, better. Don't forget to draw that surface. So, even later on if you change the thing like if you decide to put her on a bar stool or something, this is still the seat that she's sitting on. Okay, I want to do this real quick because you're going to see a lot of sitting figures and with crossing legs. So, let's do another example of the muscles and fat squishing over. This is your pelvic box. She's sitting kind of straight at us. Let's say that's the center. And that's where her legs are coming, and her knees are crossed. Okay, she's kind of like that. Her knee is up here, and that's the angle of her calf. And then this one, her knee is down here. Her calf is angled like so. The angle is about there. So, that's her leg there.
[23:46]I know, it looks really weird right now. So, there's her hip. There's her knee. Her knee cap is really high up there. And this is coming forward and there's her other knee. This if she were standing and her muscles weren't being moved around, her calves, the muscle would sit further out like this, just a little bit. And then all of this would be much flatter because right now it looks so wide because it's squished. Okay? It's not just kind of more cylindrical like it usually is. Push a little bit out like that. There's that divot in here, and that's where her muscle gets pushed out, coming back in. There's the ankle, and there's her foot. I should really draw that more foreshortened. And then this one, this one is not squished. It's just hidden. Okay? It's the one on the bottom, and so you're not going to see muscle squishing. You're just going to see it back here. You're going to see a lot of different, pose variations, but the point is to pay attention to your visual reference, and pay attention to what is being squished around. This kind of pose, you don't see much foreshortening or muscle compression. You do have to make sure that you kind of layer the calf in front of the thigh, because if you draw this line, It looks like the thigh is in front of the calf, which doesn't work with the way it's folded and everything. So, you got to make sure that you draw this curve in the front. This kind of sitting pose is one of the easier ones. There's no foreshortening, not even in the arms, and there's no muscle compression because this is like almost a 90-degree angle. There's no squishing, nothing. These two things, foreshortening and muscle compression, they don't change for children. They don't change for male to female. Because, I mean, maybe the guy you're drawing is more muscular. Okay? Not all men are more muscular than all women. There are super toned women and men that show zero muscle definition. Okay? So, yeah, foreshortening. And in this case, not so much muscle compression, just #alwaysbepracticing #practicenotmagic #ifyourfirstonesucksyoureightontrack.
[26:43]#itsheartbecauseitshardnotbecauseisthereanythingwrongwithyou. I know, I have a million of these. I'm going to make t-shirts, eventually. All right, drop me all the questions in the comment section below. Share this video with people who love figure drawing, and I'll see you in the next video.


