[0:00]The sauna is a centuries old Finnish tradition that was once considered an ancient type of bath. In Finland, most homes and even many offices have one and the sauna is still an important part of everyday life. But wherever you come from, there's no need to sweat because I promise to cover all the bear essentials. This outdoor sauna is made of Canadian red cedar and aromatic wood that's also resistant to moisture induced rot and mold. The wood is first measured with a hydrometer to ensure its moisture content is below 12%. If the wood is too moist, it would dry out and shrink after assembly leaving gaps between the planks. Once it's confirmed that the wood is stable, the planks are put through a molder. The machine's seven different tool heads smooth the top and bottom surfaces and carve the tongue and groove edges which will tightly lock one plank to the next. The barrel-shaped sauna is then assembled in sections.
[1:06]The lower section starts with a central plank that has a tongue on both sides. To each of these is fitted the groove side of a tongue and groove plank. The tongue and grooves fit together so well that the joints are watertight.
[1:23]More planks are added until there are eight on either side of the central one. The sauna's back wall is constructed using the same technique.
[1:39]Once all the planks are in place, a circular template is laid on top and clamped into position.
[1:49]A router is then used to cut around the template.
[2:09]To further secure the planks to one another, angled holes are drilled through them.
[2:18]To allow them to be screwed together. Three horizontal reinforcement planks are also fitted. Again using a template as a guide, openings for windows are cut with the router. Window moldings are then screwed around the opening.
[2:41]An adhesive back rubber insulation strip is added along the perimeter of the back wall to prevent heat and moisture from escaping.
[2:59]The back wall is now mounted onto the bottom section, followed by the front wall, which is constructed in the same way as the back, with the addition of an opening for a door. Planks are now added to both sides of the bottom section to build up the curved side walls.
[3:25]The side walls meet at the top. On either side of a central plank that's been wired with the sauna's LED ceiling lights.
[3:36]Three galvanized steel cables are now strapped around the sides of the barrel. These are then tightened to a specific tension to further bind the planks together.
[3:57]The structural assembly is now complete and the interior components can be fitted, starting with a thermometer and hydrometer. A pivoting cover is mounted over the air vent which allows the user to control the amount of outside air entering the sauna. Then an hourglass that counts down to 15 minutes to let you know how long you've been sweating. Next, an electric stove is fitted, which will be filled with volcanic rocks that will absorb and store the heat. Pouring water onto the hot rocks then radiates that heat.
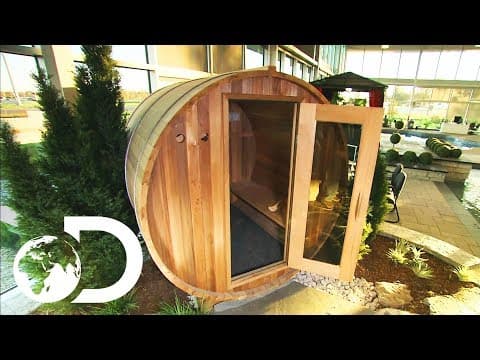
[4:38]After installing benches along the side walls and a water resistant rubber floor, the door is fitted. The glass in both the door and the rear window is tinted for privacy. So, now everyone should be able to sit back, relax, and perhaps engage in some polite chit-chat. After all, a sauna is no place for things to get heated.


