[0:00]The bowling ball has undergone a lot of changes over several centuries to become the ball it is today. From a crude stone, to carved wood, to rubber, to molded polyester, it's been reinvented numerous times. But the latest version has turned out to be a real winner. Roll on.
[0:24]Technological advances have reshaped the bowling ball at its very core. The center is asymmetrical, which causes the ball to curve towards the pins as it rolls down the lane.
[0:39]The core is made from polyester resin. Blending in minerals like barites, silica powder, and limestone. The result looks like a chocolate milkshake, or make that hot chocolate, because a catalyst triggers a chemical reaction that heats it up. As the mixture is piped into the molds, it quickly starts to cure and solidify. In just two minutes, it's ready to extract. This core is oblong, flat on one side with a knob. There are different versions of this core design. Each one carefully calculated to manipulate the bowling ball's performance at a specific skill level.
[1:34]The core is drilled to make a pinhole.
[1:39]This allows the core to be suspended in just the right position in a second mold. The center is about to be held in a more uniform sphere. The core is pressed onto the bottom part of the mold, and the top is locked into place, preventing any plastic from leaking out.
[2:05]It's a liquid polymer blend. A special chemical and it causes the mix to solidify slowly. It can take days for it to harden around the center, depending on the formulation and type of bowling ball being made. When a mold is opened, all is revealed. The core is now sealed in a symmetrical polymer shell.
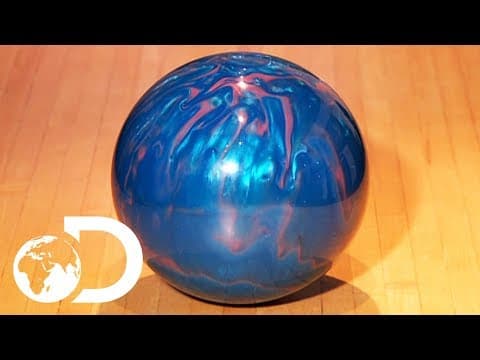
[2:35]Next, it's into a third mold. This one will seal the bowling ball in an outer skin called the veneer.
[2:45]This veneer has been scientifically formulated to enhance the ball's traction on the alley to curve it towards the bowling pins. It's made of colorant, plasticizer, a chemical called ISO, and urethane. Blending these ingredients produces high performance polyurethane.
[3:11]As the mix flows into the molds, a chemical reaction causes it to heat up and solidify in just a few seconds. It's then put into an oven to boost the chemical reaction.
[3:27]Next, a spinning grinder shaves off the bump, which was formed by the overflow at the mold's intake.
[3:41]With its three layers, this bowling ball looks like a big gobstopper when it's sliced in two.
[3:51]And while it may look sweet, it needs a bit more work before it's ready to take on the competition. A lift system delivers the bowling ball to a sanding machine, which roughs up the surface. The coarseness of the sanding varies, depending on the performance goals of the particular ball. This machine heat stamps trademark information onto the surface.
[4:22]The ball is given one last sanding, as a constant flow of water removes the powdery residue. The more polished the surface, the less pronounced the ball's curving ability will be. Even this last sanding is for a certain performance standard. The surface is polished for the last time. And all that's left is to drill the finger holes. With this bowling ball in hand, success should be within striking distance. Watch the lens. Watch the lens. Move the camera for goodness.


