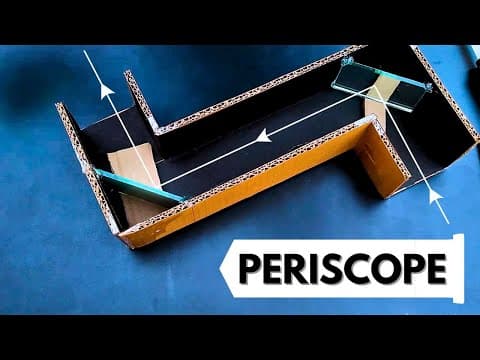
[0:05]So hello everybody, aaj hum banane wale hai ye amazing sa ek periscope jo aap logo ko aapke school projects mein aur waise fun activities karne me madad dega. Ye basically ek chota version hai of a periscope jo ki actual mein submarines wahan mein use kara jata hai to view distant object from the underwater. matlab aap ek dusre level of plane pe rehte hue dusre level of plane ki cheezon ko observe kar sakte ho using this periscope. Sabse pehle apn lenge cardboard and cardboard ka hume pehla ek piece ban banana hai ye Z shape ka jisiski dimension aapko screen pe dikhai pad rahi hongi. In dimension ka hum ye piece cut karna hai and dusra piece bhi same dimensions ke sath hoga but isme thoda sa change hai ki isme do strips extra hain. Jaise ki aap dekh rahe ho yahan Z to proper ban raha hai but iske alawa bhi do side strips extra hain jo ki yahan pe covering ka kaam karengi taaki andar ka area poori tarike se cover ho sake. To inhe bend karke aur iske sath hum isko bend karke banayenge. Uske alawa humein do pieces chahiye honge 16:8 cm ke and jaisa ki aapko screen pe dikh hi raha hai. Iske alawa do pieces chahiye honge 8x8 ke squares ke jo ki aapke samne hai. To ye sare pieces collect karne ke baad hum start karte hai isko assemble karna.
[1:27]To after doing the taping work ye hamara banke tayar ho chuka frame. And jaisa ki aap dekh rahe hain main upar wale cover lid ko lagata hun to uske baad ye poori tarike se close ho ja raha hai. And iske baad ab humein thoda sa cheezon ka dhyaan rakhna hai, pehle humein iske andar black colour ka kuch paper lagana padega aur uske baad hum iske andar glass lagayenge. To ye paper ko humein iske andar lagana hai. To let's do this. To black paper yahan par humne iske andar laga diya taaki reflections humein clearly dikhayi pade aur andar jo bhi humein reflections aayein wo saaf sutre dikhein. To poori coating hone ke baad now it's time to place the glass strips. Ise humein 45 degree ke angle pe do dono side ke corners mein lagana hai ek is corner pe kuch is tarike se and the second one on the other corner as well. To 45 degree ke angle pe using the glue gun hum ye dono kono ko attach karna hai. Agar aapke paas glue gun nahi hai to you can use the double-sided tape or a normal tape as well.
[2:38]Last step rehta hai isko poori tarike se seal karne ka and taping karne ke baad iske corners ko seal karne ka taaki bilkul bhi light jo hai andar na ja paye aur joints jo hai wo mazboot ho jaye. Aur ye karte waqt dhyaan rakhna hai aapko kahin par bhi gap nahi chhodna hai. Har ek jagah par aapko properly tape ko lagana hai taaki uski strength maintain rahe aur ye tha final look. Maine bahut zyada decoration nahi kara basic tape lagane ke baad upar maine ek covering tape lagayi black colour ki jisse ki andar kisi bhi tarah ki light na jae other than the two openings. To ye hai pura tayar periscope isko aap apne school projects ke hisaab se aur thoda enhance aur decorate kar sakte hain. Maine as much itna nahi kara but it is working and poori tarike se functional hai to it's okay to help you guys. To yahan par iska output aap dekh sakte hain and at this place yahan pe maine isko deewar ke upar tanga taaki hum lower angle se I mean lower plane se ek higher plane ki objects ko dekh sake jaisa ki aap logo ko screen ke upar dikhai pad raha hai. Agar ye video aapko kisi bhi tarah ki koi value provide kar paya hai aur aapki madad kar paya hai to make sure to hit the like and subscribe button. And agar aap aisi hi amazing videos dekhne ke liye interested hai to click on the above video. To milta hun aap logo se agli video mein till then have a great day good bye take care sayonara.


