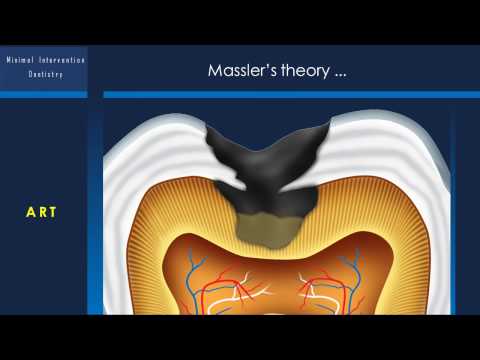
[0:00]Hello everyone. Today we are discussing about minimal intervention dentistry for undergraduate students. I am Dr. Benin, a Conservative Dentistry and Endodontic Specialist at Rajas Dental College. The outline of our discussion includes introduction and definition, historical development of dentistry, revised classification of caries, principles of minimal intervention, diagnosis of caries, risk assessment, and prevention. We will also cover minimal intervention techniques like ART (Atraumatic Restorative Treatment), rotary burs, sonic oscillations, chemo-mechanical caries removal (CMCR), air abrasion, lasers, enzymes, and ozone therapy. Additionally, we'll explore minimally invasive cavity preparation designs such as tunnel preparation, slot preparation, microchip preparation, minibox preparation, and full box preparation. So, what is minimal intervention dentistry? It's also known as preservative dentistry or microdentistry. Minimal intervention dentistry means "to intervene," while minimal invasive dentistry means "to invade." Minimal intervention dentistry can be defined as a philosophy of professional care concerned with the first occurrence, early detection, and earliest possible cure of disease on micro levels, followed by minimally invasive, patient-friendly treatment to repair irreversible damage caused by such disease. It's a conservative approach to caries treatment that simultaneously offers patients less invasive and health-oriented treatment options. The three stages of the Minimal Intervention approach are to Identify, Control, and Preserve. Now, let's look at historical concepts. Greene Vardiman Black, from 1835 to 1915, envisioned a future where preventive dentistry would take precedence over reparative dentistry. This led to the concept of "prevention of extension." The restoration cycle illustrates the progression of dental restorations over time. Next, we will discuss the revised classification of caries. The Mounts classification categorizes caries based on site (pit/fissure, contact area, cervical) and size (minimal, moderate, enlarged, extensive), resulting in specific codes like 1.1, 1.2, etc. Now, let's move on to the principles of minimal intervention. These principles include accurate caries diagnosis, assessing severity of caries using radiographs, individual caries risk assessment, arresting active lesions, remineralizing and monitoring cavitated arrested lesions, placement of restorations in teeth with cavitated lesions using minimal cavity design, and assessing disease management outcomes. In 1995, Bernhall and Geright proposed 10 commandments of minimally invasive dentistry. These include always following the philosophy, performing the least amount of dentistry needed, never removing more tooth structure than absolutely required, always using dental materials that conserve maximal tooth structure over time, using only dental materials researched by leading schools and recommended by practicing dentists, using the strongest and longest-lasting materials to reduce future repair/replacement needs, keeping dental appointments short, using procedures that minimize necessary appointments, selecting dental laboratories that use minimal invasive materials for restoration of teeth, and using only restorative materials that do not wear opposing teeth more than enamel. Let's explore minimal intervention techniques. Atraumatic Restorative Treatment (ART) was first developed by Frencken Joe and Makoni F in Tanzania in 1980. Massler's theory states that a zone of affected dentin exists between the outer infected layer and the pulp. When the infected dentin is removed, this affected dentin can remineralize, thus avoiding pulp exposure.
[1:55]Indications for ART include community and/or field settings, places where only hand instruments may be available, rural settings and developing countries, elderly populations in nursing homes or confined to their homes, schools or clinics in the community, and situations requiring little setup time with portable equipment. Advantages of ART include the use of easily available and relatively inexpensive hand instruments rather than expensive electrically driven dental equipment. It's a biologically friendly approach involving the removal of only decalcified tooth tissues, which results in relatively small cavities and conserves sound tooth tissue, limiting pain and minimizing the need for local anesthesia. It is also a straightforward and simple infection control practice without the need for sequentially autoclaved handpieces. Other advantages include the chemical adhesion of glass ionomers that reduces the need to cut sound tooth tissue for retention of the restorative material, the leaching of fluoride from glass ionomers which prevents secondary caries development and probably remineralizes carious dentin, the combination of a preventive and curative treatment in one procedure, the ease of repairing defects in the restoration, and the low cost. Disadvantages of ART include that long-term survival rates for glass ionomer ART restorations and sealants are not yet available; the longest study reported so far is of three years' duration. The technique's acceptance by oral healthcare personnel is not yet assured. At the moment, tissue is limited to small and medium-sized, one-surface lesions because of the low wear resistance and strength of existing glass ionomer materials. There's also the possibility of hand fatigue from the use of hand instruments over long periods. Additional disadvantages are hand mixing which might produce a relatively unstandardized mix of glass ionomer, varying among operators and different geographical/climatic situations. The misapprehension that ART can be performed easily – this is not the case, and each step must be carried out to perfection. The apparent lack of sophistication of the technique, which might make it difficult for ART to be easily accepted by the dental profession. And a misconception by the public that the new glass ionomer "white fillings" are only temporary dressings. First, isolate the tooth. Remove the unsupported enamel using enamel chisels (hoe and hatchet). Remove excess with hoe.
[2:30]Remove excess with hatchet.
[2:40]Remove infected caries lesions using a spoon excavator.
[3:02]Dispense one drop (1st drop) of Fuji IX GP EXTRA liquid for conditioning the cavity (this drop can contain air bubbles). The next one or two drops are meant to be mixed with one or two spoons of powder.
[3:25]Condition for 10 to 15 seconds.
[3:34]Rinse cavity using an air water syringe or wet cotton pellet.
[3:47]Repeat this step a few times.
[4:02]Dry the cavity with several cotton pellets. Powder-liquid mixing. Lightly tap the bottle to loosen the powder.
[4:22]Divide powder into two equal parts. Use the second drop for mixing the powder. Spread the liquid to facilitate the mixing.
[5:07]Mixing should be ready within 25 to 30 seconds. Filling the cavity (use appropriate matrix band for class II filling).
[5:36]Not only overfill the cavity but also apply the remaining GIC on the fissures.
[5:45]Use press-finger technique and remove excess immediately afterwards.
[6:04]Remove matrix band approximately 5 minutes after mixing. Start sculpting.
[6:35]Check height with articulation paper. Apply G-Coat PLUS and light cure.
[7:12]Light cure for 20 seconds.
[7:27]Final result: both primary molars treated with ART. Now, let's explore smart prep burs. This has a Knoop Hardness of 50 and was developed with the aim to be harder than the carious, softened dentin (Knoop hardness 0-30) but softer than healthy dentin (Knoop hardness 70-90).
[7:48]Now let's explore sonic oscillation or sonoabrasion.
[7:58]Next, we will discuss chemo-mechanical caries removal.
[8:18]Next, let's look at air abrasion or kinetic cavity preparation. Air abrasion was first described in 1945 by Dr. Robert Black. In 1951, the S.S. White Company introduced the Air dent air abrasion unit. Air abrasion removes tooth structure using a stream of Al2O3 particles generated from compressed air, bottled CO2, or N2 gas. Indications for air abrasion include caries removal, tooth preparation, etching tooth for the placement of composites and ceramics, as an adjunct to dental drill & handpiece bur, removal of superficial enamel defect, cleaning fissures & surface preparation for sealants, preparation for preventive resin restoration, removal & repair of composite, GIC & porcelain, and removal of pit and fissure stains before placement of resin-based composite. Contraindications include asthma/dust allergy, periodontal disease, laceration, recent extraction sites, and subgingival preparation. Advantages of air abrasion include no shattering of enamel or microfractures as with the bur, no heat production, it's silent and fast, and preparation maintains the structural integrity of the tooth. Disadvantages include no tactile feeling as the handpiece tip does not touch the tooth. End cutting – hence requires some practice before comfortably using it. Does not remove soft decay – particles bounce off areas of soft dentin, similar to a ping pong ball or absorbed. Dust problem – powder settles on the surface. Produces round cavities not suited to preparations requiring definitive walls and sharp margins. Risk of soft tissue lacerations and air embolism. Operating modes include focused mode (1-2mm away from the tooth, then cuts enamel/dentin) and defocused mode (farther away, cleans the surface, explores and helps locate dark lines, decay, or organic plug). Variables are air pressure, particle size, powder flow, tip size, tip angle, and tip distance from the tooth. Particle size is 27μ. Small particles cut faster because the surface is increased, and cut smoother. Large particles require higher velocity, with less cutting surface. Other operating modes include powder flow (2 g/min) and air pressure (80 Psi). Nozzle tip: small diameter tip increases pressure and decreases flow, large diameter tip decreases pressure and increases flow. Tip orifices: 0.011 - 0.032. Large lesions use a 0.018 inch nozzle, small lesions use a 0.014 inch nozzle, and pit and fissures use a 0.011 inch nozzle. Tip distance: if far, then kinetic energy decreases, and cutting efficiency decreases. Precautions include the use of a rubber dam or 4x4" gauze to block the throat, directing the spray away from the gingival tissues, and for class II preparation, a barrier should be placed between teeth. Old amalgam should not be removed due to mercury dust in the air.
[9:13]Now let's explore lasers. Lasers provide a precise and minimally invasive way to address dental issues.
[9:28]It is important to use appropriate eye protection during laser procedures. Now, let's discuss ozone therapy. Components of Heal Ozone include an O3 generator, a vacuum pump, an O3 destructor (or catalyst), and a handpiece with disposable silicon cups (3-10mm in diameter).
[9:48]The Clinical Severity Index (CSI) for Ozone Exposure, developed by Lynch and Holmes, provides recommended treatments based on the lesion and its classification. For a carious lesion into dentin, sizes 2, 3, or 4, a 40-second ozone exposure is recommended. For a carious lesion with cavitation and possible dentin involvement (sizes 1-2), 30 seconds of ozone exposure is suggested. A carious lesion without cavitation (size 0) requires 20 seconds, and an arrested carious lesion needs 10 seconds of ozone exposure. Let's revisit minimal intervention techniques. For slot cavity/minibox preparation, enter the lesion through the crest of the marginal ridge, confine the cavity to the extent of caries, and restore with the lamination technique. The lamination technique involves the use of fast-setting high-strength GIC as a base, which allows sound ion exchange, and the placement of wear-resistant composite. The bilayered/sandwich technique.
[10:18]For proximal approach (direct approach), advantages include conservative treatment, maintaining the marginal ridge, preventing the risk of iatrogenic damage to the adjacent approximal surface, and maintaining the normal contact area. Classification by McLean, for occlusal approach, includes approximal Class II cavity, approximal Class II microcavity, and tunnel or internal fossa cavity. For approximal approach, we have approximal microcavity (direct approach) and buccolingual approximal cavity (buccal/lingual approach). Tunnel cavity - open tunnel. Internal preparation (partial or blind tunnel). Tunnel procedures involve both "closed" and "open" tunnel techniques.
[10:53]Thank you. To conclude, minimal intervention dentistry aims to preserve as much natural tooth structure as possible. Thank you for joining me for this discussion on minimal intervention dentistry for undergraduate students.


