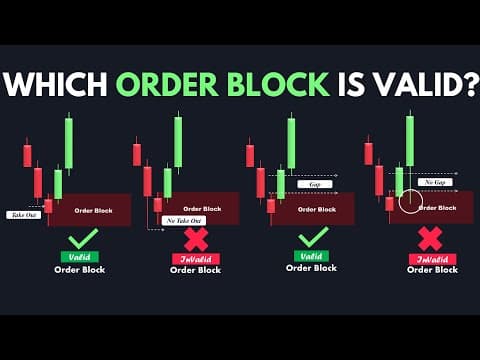
[0:00]Hey traders and welcome to another episode of Smart Risk. Trading without the skill to identify valid and high-quality order blocks can be extremely risky and may result in significant losses. Order blocks, often overlooked by many, play a pivotal role in executing well-informed trading opportunities and are a cornerstone in the strategies of smart money traders. However, many traders struggle to identify valid and high-quality order blocks, putting their trades at risk. Today in this advanced episode, we are diving into various candlestick order block types, trading strategies and price actions associated with order blocks that you might encounter in the market. But that's not all. We'll break down the key criteria and rules that elevate an order block to a high probability trade. So traders, if that's something you're interested in, please give this video a thumbs up to show your support and subscribe to our channel if you are new. See you after intro. Welcome back traders. So let's get started. Now let's dive deep into the details of the order blocks and see what is the exact definition of the order block. In the bearish scenario, order block refers to the zone corresponding to the last bullish candle before a sharp and substantial downward movement that generates a valid break of structure. Similarly, in the bullish scenario, it refers to the area corresponding to the last bearish candle before a sharp and substantial downward movement that forms a valid bullish break of structure. Now, let's see what is the psychology behind these zones in the market. The theory behind considering these zones as potential reversal areas is based on the belief that they represent manipulation areas formed just before a significant market movement. Traders view these zones as areas where a large number of buy or sell orders have been executed. Therefore, by using these zones in our trading strategy, we can potentially take advantage of the high probability of price reversal and change in direction when it reaches these areas. Now, let's proceed to the next topic and discuss how to identify a valid order block in terms of candlestick patterns and see the various scenarios that we might encounter in identifying candlestick-based order blocks on the chart. In a bullish scenario, a candlestick-based order block refers to the last selling candle before the price starts pushing upward drastically. This candle typically breaks below or effectively sweeps the liquidity of the lowest point of the previous candle. For example, in the bullish diagram, we identify this red candle as a valid order block. It serves as the last bearish candle before the price initiates a drastic upward movement, having taken out the lowest point of the previous bearish candle and effectively swept its liquidity. Similarly, in a bearish scenario, a candlestick-based order block refers to the last buying candle before the price starts pushing downside drastically. This candle typically breaks above or effectively sweeps the liquidity of the highest point of the previous candle. Now, let's move into essential criteria and rules that we need to consider to identify valid order blocks in the market and understand how we can use them to our advantage. It's crucial to note that to have a confirmed and valid order block, firstly, price must take out and sweep the liquidity above or below the previous candle to form a valid order block. Secondly, price must leave inefficiency behind and generate imbalance near the order block area. If there is no proper imbalance between the subsequent candles, then the identified order block cannot be considered valid. Rule number three. It must be unmitigated. Order blocks are considered one-time use, meaning we focus on the trading opportunity when price first enters an order block. Once an order block has been mitigated, we do not consider it as an area of interest for future trading. Rule number four. It emphasizes that a high-quality order block must lead to a break of structure or a change of character in the market. Break of structure and change of character are essential signals that indicate whether the market will continue in its initial direction or will experience a reversal. To solidify our understanding of order blocks, let's examine more examples. Consider a series of bullish candles as illustrated. As you can see, the market momentum was bearish until the price created this weak bullish candle just before starting to push upward with these three large green candles. This weak bullish candle reached its lowest point here, and additionally, it took out and effectively swept the liquidity below the previous candle. As mentioned earlier, without a proper imbalance in the subsequent candles that form after the order block, our identified order block cannot be considered valid. If we look at this three-candle sequence, we see that the upper wick of the first candle and the lower wick of the third candle do not overlap the whole body of the middle candle. Here, we have a gap between the candles, representing the imbalance. Since the criteria for a valid order block are met here, this candle represents a valid order block. If we look a bit higher, we see that once again, the price has created an upward drastic movement. This red candle represents the last bearish candle that had just been formed before the price started to push drastically to the upside. We can see that this bearish candle has taken out and effectively swept the liquidity below the previous bearish candle. Since the price has also created a proper gap between these three sequential candles, meeting all the criteria for identifying a valid order block, we can now consider this candle as a valid order block with the potential to reverse the price if it pulls back down and mitigates it. As you can see, this bearish candle here is the last bearish candle before the price formed another bullish movement. However, this candle does not represent a valid order block because it did not take out the previous candle's low. Let's examine more examples. Consider another series of candles as illustrated in the second diagram. Once again, we see that the price has taken the low of the previous candle, effectively sweeping liquidity below it with this bearish inverted hammer candle. Thus, we have a potential candidate for a valid order block. However, there is no noticeable imbalance among these three candles, and the order block is mitigated by the upper wick of the bullish candle. Consequently, this order block cannot be considered valid as it fails to meet most of the necessary criteria for validating an order block. Therefore, it cannot be utilized as a demand zone. When faced with scenarios like this, where the price has taken out the liquidity from the previous candle, but the order block is mitigated, or when the price fails to create inefficiency, we designate the subsequent candlestick as the valid order block. In this case, we identify this bullish candle as the valid order block instead of the previous selling candle. This decision is based on the fact that the price has generated a proper inefficiency or imbalance immediately following the bullish candle. If we look slightly higher, we notice that the price has taken the low of the previous candle, effectively sweeping liquidity below it with this bullish candle, before the price starts to push significantly higher. However, there is no discernible imbalance, and this order block is mitigated by the upper candle's wick. Therefore, this order block cannot be regarded as valid, and consequently, cannot be utilized as a demand area. Continuing, once again, we see that the price has pushed significantly to the upside. This red candle represents the latest bearish candle that is just formed before the price started to push dramatically higher. It is evident that this bearish candle has surpassed and effectively swept the liquidity below the previous bullish candle. As the price has also created a proper gap between these three sequential candles, and there is no mitigation, all the criteria for identifying a valid order block have been met. Consequently, we can now regard this candle as a valid order block. These concepts are applicable to bearish markets as well.
[8:26]It's important to note that these principles can be applied across various time frames in any price action-based chart. Now, let's proceed to the real chart and integrate all the concepts we've explored in this video. We'll examine how to effectively identify valid order blocks in the market. So here we have Euro dollar 15-minute time frame chart on the screen. As you can see, the market's overall direction is in an uptrend. Upon analyzing the chart, we notice that the price has established a bullish break of structure by breaking and closing above this major high. With the emergence of the break of structure, our focus should now shift to identifying order blocks associated with the BOS. This white candle at the extreme represents the last bearish candle that has recently formed before the price began a significant upward push. It has successfully taken out and swept the liquidity below the previous candle. However, upon closer look, if we highlight this candle, it becomes apparent that this order block is mitigated by the upper tiny wick. Therefore, we cannot consider it a valid order block. Looking slightly higher, we notice another bearish candle that represents the last one before the price began a significant upward push. It's clear that this candle has taken out the low of the previous candle. Upon highlighting it, we see that it is mitigated by the upper wick of the bullish candle. As mentioned earlier, if our identified order block is mitigated by the last candle of the three sequence candles, we should consider the next candlestick as the valid order block. Therefore, this candle serves as our valid order block. Let's continue. In the following sequence, we see that the price has initiated another upward movement. And this candle is the last bearish one before the upward push. It has taken out the low of the previous candle. However, upon highlighting it, we see mitigation with the wick of the third candle, mirroring a scenario we discussed earlier. Consequently, we identify the next candlestick as the order block. Yet again, it is mitigated. This time by the upper candle's wick. Therefore, we proceed to the next candlestick. Traders, the red hammer that follows is our valid order block. Nevertheless, upon closer look, we note that the price touched it and after a minor reaction, pushed to the downside without respecting the order block. The primary reason for such price action is that we should always wait for the price to take out the inducement before executing a buy or sell position. This topic has been covered in our earlier episodes. I highly recommend that you go through our channel and watch them for a more comprehensive understanding. Continuing, we see that the price continued its downward momentum, pulled into our valid order block, experienced a reversal, and subsequently pushed higher. If we were analyzing a live chart, this order block would present a great opportunity for us to execute a long position and enter the market. In the continue, we see that the price has formed a change of character pattern by breaking and closing this structure. After the emergence of the change of character, it is crucial to wait for the price to take out the inducement before considering long or short trades and entering the market. In this case, this candle's low represents the most recent internal level that the price has formed in its upward path. So, once the market has taken out the inducement, the next step is to wait for the price to mitigate our identified valid order block. In this scenario, this white candle represents the last bearish candle that formed just before the price pushed drastically to the upside, sweeping the liquidity below the previous candle's low. Additionally, there is a noticeable imbalance above it. Hence, this candle is our valid order block, offering a high probability if the price mitigates it. If the price taps into it, we should consider entering the market with a long position. Traders, we have thoroughly covered the major order blocks that frequently appear on real price charts, enabling us to develop a solid understanding of how to identify them. Now, in the following section, we will explore the entry models that can be incorporated into our trading plans using order blocks. These entry models will serve as effective tools for executing trades based on the insights gained from order block analysis. There are four primary types of entries that we can employ when executing trades using order blocks. The selection of a specific entry type depends on various market factors, such as the market's movement, sessions, volatility, and other relevant factors. By considering these factors, we can choose the most suitable entry type for executing trades effectively. The first entry method involves using the wicks to execute trades. In this type of entry, after identifying a valid order block, we place our buy or sell order directly on the wick. In the case of a sell position, we will place our stop loss a spread size above the higher wick of the order block. This entry setup provides a wider stop loss margin, which can directly impact the reward to risk ratio by reducing it. However, using this type of entry increases the probability of your order being triggered since price may simply touch the wick and then push to your expected direction. The second entry type is referred to as the body entry. In this approach, once a valid order block is identified, the entry is placed based on the body of the candle. For sell positions, the stop loss is set a spread size above the higher wick of the order block. This entry method typically offers a higher reward to risk ratio compared to the previous entry type because the stop loss is tighter. This approach carries a slightly higher level of risk. There is a possibility that price may only touch the wick of the order block and then move in the anticipated direction without triggering your buy or sell order. Consequently, there is a chance of missing out on a potentially profitable trade opportunity. Let's move to the next entry type. The third type of entry, which I personally prefer and utilize more frequently in my trading plan, involves placing the entry at the midpoint of the order block zone, once a valid order block is identified. In the case of a bearish scenario, the stop loss is positioned a spread size above the highest point of the order block. This entry type offers a reward to risk ratio that is at least twice as large as the regular entry types mentioned. This is due to the refined entry point and the smaller size of the stop loss. This is precisely why this entry type holds a special place as my favorite approach. By employing this approach, we can potentially enhance the profitability of our trades while effectively managing risk. The fourth entry type involves placing the entry based on the body of the candle once a valid order block is identified. In sell positions, the stop loss is set to touch the higher wick of the order block. This entry type is undoubtedly riskier because the stop loss is positioned within the order block zone. If the price intends to fully reverse the order block, it may trigger the stop loss. It's important to be aware of the increased risk associated with this entry type and carefully consider its suitability within your trading strategy. That's it, traders. Thank you for watching this video. I hope you found it informative and useful. Don't forget to hit the subscribe button and turn on notifications to stay updated on our latest videos. We value your feedback and suggestions, so please leave your comments below and let us know what topics you'd like us to cover in our future videos. We appreciate your support and look forward to seeing you in the next episode.


