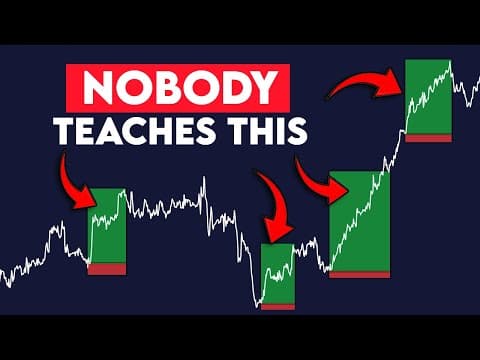
[0:00]I have a three-step formula that I backtested thousands of times. And every single month that I tested it, it was profitable in the long term. No indicators, no patterns, just pure price action, baby. It really is the fun part of this whole technique. I have, I have more pleasure just beating the brush than anybody in the country. And by the end of this video, you two will know this strategy and will be able to take calculated trades just like this one and make insane amounts of money. Woo! To jump right into it, the first step involves market structure. Now, this is arguably one of the most important steps, because if you even just slightly fuck this part up, it will ruin the whole strategy. Come on now, dog. Come on, man. One of the very first things you learn as a trader is uptrends and down trends. It's almost like the sippy cup of trading. A chart that makes higher highs and higher lows is an uptrend. A chart that makes lower lows and lower highs is a downtrend. Simple enough. Everybody knows this. Now, you may be thinking, why are you even going over this? I already know all this. Well, what if I told you, you're probably doing all of this completely wrong? Let me explain. So, going back to our example, the chart does this, making higher highs and higher lows. And as we already stated, it's an uptrend. Okay, but then something interesting happened. The chart starts heading downwards, which in this process, price makes this low, and breaks right through it. And this exact point is where I see the majority of traders make the mistake. Since price broke this low, a lot of traders think we are now in a reversal and price is in a downtrend. So, in return, they start looking for short trades because they now think price is going to head lower. But what if I told you this chart is actually still fundamentally bullish? Oh. You see, sure price made this low, but this low is actually not a low at all, or at least a valid one. Why? Because price never broke the valid low, which is right here. I want to make this very clear. In order for a low to be validated, it needs to break the previous high. If you do not understand this part of the strategy, the strategy will not work. You are done. Fired. So, say if price does break this high, we now know this is a valid low. Okay, good. So now price is in an uptrend, which means we should only look for bullish trades. The only time we should start looking for short trades is if price breaks this low. It can do anything right here. It can go up, down, sideways, literally anything, as long as it doesn't break this low, we are in an uptrend. Now, say if instead of doing this, price did end up breaking upwards. Since price did break our previous high, our new low will be transferred from this point to this one. So, that's the first step, identifying if we're in an uptrend or a downtrend. So, what's next? That would be step two in the formula. Step two is identifying supply and demand in the markets. Demand zones take place in uptrends, supply zones take place in downtrends. A good style of thinking is you want to buy from demand zones and sell from supply zones. Here, if we look closely, the market is going up. Since we saw a large push from the beginning of this move, it simply shows us that a lot of people wanted to buy from this point onwards. So, we can assume if price comes back down to this area, traders will have the same style of thinking and want to buy in the same area again. Nice. A supply zone is the exact opposite. Since we saw a large downwards move from this point on, it shows us that a lot of people want to sell at this area. So if price ever retests this zone, we can assume price will again move downwards from this point. This supply and demand theory is the core of our strategy. But we still have one more step in our three-step formula. But let me show you some trading profits real quick. I made a video the other month saying I was going to try to use Hanker Trade's copy trading feature, where you can copy professional analysts by simply clicking a button. Now, when they first asked me to test this, I was a little skeptical at first. I'm not going to lie. But I decided I wanted to test it out for myself. What I did was click this top performing section, so I only saw the top performing analysts. I then saw this guy that had an 86% win rate. So, I decided to test him out. I tested this by depositing around $50,000 a month ago. That $50,000 is now $160,000. Just from clicking a follow button. Pretty insane. I'll proceed to update you guys on Instagram on how the copy trading is doing. new face filters on Instagram today. This is my favorite one so far. Nice job, team. But in the meantime, if you want to test the copy trading feature too, I'll leave a link in the description so you can check it out. Okay, let's go back to the video to a real life example using the strategy I just taught you. So, looking at a real chart, we see price moved upwards, came down and then broke this previous high, which means we have higher highs and higher lows, meaning we're in an uptrend. Since we're in an uptrend, we only look for long trades. We do not look for any sell positions, as shorting in an uptrend is just silly. Since this low broke the previous high, this is our valid low, and price will only be in a downtrend if it breaks this point. So, now that we know we're in an uptrend, we want to look for demand zone opportunities. We can find our demand zones by finding an area of consolidation or a point where price moves sideways for having a sharp move upwards. As you can see from this chart, we had some consolidation right here. The price shot straight up afterwards. How I like to mark my demand zones is marking the candle right before the impulsive move. So, grab your rectangle tool on the side, find the area of consolidation before the big move. Then mark from the low to the high of the previous candle before the big move. This is our area of demand. Again, we are not even considering areas of supply because we are in an uptrend.
[5:36]So, we don't even need to worry about that. We wait for price to re-enter into the zone, and this is where we would enter. Set your stop-loss right below the demand zone and set your take profit at the recent highs. Boom, we got an easy winning trade. So, that's an example of just one winning trade. But I want to show you just how accurate the strategy really is. So, let's break it down with the real chart example. Here, we have an uptrend because price is making higher highs and higher lows. So, as we can see, this low is what broke the previous high. So, this is where price needs to break in order to be in a downtrend. Which is exactly what ends up happening. So, now we are in a downtrend, and we only look for areas of supply or short trade. So, in return, we mark our areas of supply. Price comes back up to this zone, we enter, set our stop loss right above the area of supply and set our take profit at the recent lows. Boom, we got an easy winning trade. But wait, we're not done. Price created another area of supply up here, and we're still in a downtrend. So, we wait for price to come up to the supply. Enter, set our stop-loss above the area of supply, target recent lows, another winning trade. But again, we're still not done. Price created another area of supply. Wait for price to come up here again, set your stop-loss and take profit, and we got another winning trade.
[7:02]That's the power of this strategy. It's extremely accurate for one, and two, you're only trading in the direction of the trend, which raises the probability of you winning a trade by a lot. So, now that you know just how powerful this strategy really is, let's go to the third and final step on how to improve the strategy even more. Our last step involves risk reward. Sometimes while using this strategy, you'll get a trade that checks all the boxes. But when you set up your stop loss and take profit, it has a low risk reward like in this example. We only want to take trades if the risk reward is above 2.5 to one, meaning for every $250 we're getting back, we're only risking $100. So, even if the chart follows both step one and two, but the risk reward is under 2.5, we do not take this trade. This one rule by itself increases the profit rate of the strategy by a ton. So, for our final example, we have price making higher highs and higher lows, meaning we're in an uptrend, so we only mark areas of demand. Price ends up consolidating right here before shooting upwards, so we mark this area. We wait for price to come to this area again, and then we enter. Set our stop loss below the demand zone and set our take profit at the recent high. Our last step is to check the risk reward and make sure it's over 2.5. Which in this example, it's three, so we're good to go there. If it's anything under 2.5, we do not take the trade. Wait for price to play out, and we get a beautiful winning trade. Then we just repeat the process forever.


