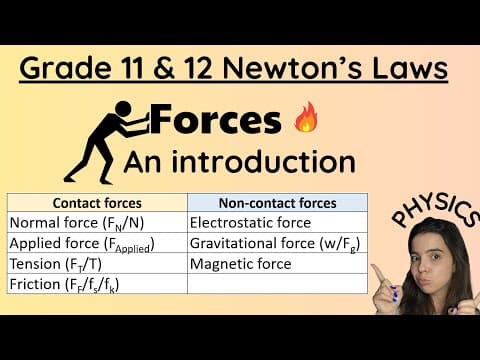
[0:00]Hello grade 11s. In today's video, we are going to be looking at forces. So this is part of the mechanic section. It comes just after vectors, just before Newton's laws. It's very, very important that you understand forces before you understand Newton's laws. So this is going to be a quick video introducing you to the various forces that you can expect in upcoming videos. I'm going to be going over the forces in more detail, like normal force, how to calculate it, weight, how to calculate it, friction, static and kinetic friction and how to calculate it. You don't want to miss any of these videos. Click the link in the description box below for my full playlist. Let's jump right in. As you should know from grade 9 and grade 10, you get contact versus non-contact forces. We'll mostly be working with contact forces in this section and in Newton's laws, but we do work with gravitational force or weight, which is obviously a non-contact force. Now, I've summarized the forces in the table behind me and I've put the symbol in brackets alongside the name of the force. These symbols are very, very, very important. We use them to label free body diagrams. We use them in the equations that we write in order to answer Newton's laws questions. So you need to use the correct symbol in order to get the marks. Now, as you can see, we will be learning about quite a few contact forces. We've got the normal force and the symbol is either FN or N, the applied force where the symbol is F applied. You may in some instances use F as your symbol. However, please only use F if the question uses F. So for example, if they give you a box and they say that a force is acting on the box pulling it to the right and the force is F and they label it F, you may label it F in your diagrams as well. But please avoid shortening the word applied, it's forced applied or applied force. Then we've got a tension force and that's the, the force that acts in a rope or a string where it attaches two objects. I will go through all of these in more detail, and we've got frictional force. So we can use F for frictional force. You can use FF, so frictional force, and here you see you got FS and FK and that's different, those are different depending on the type of frictional force acting on the object. So you've got static frictional force versus kinetic frictional force and we will go through the differences between those a little bit in this video and more in detail in their own video. Then we've got the gravitational force, which is weight, and you can either use W or you can use FG. I sometimes use W, I sometimes use FG, textbooks and study guides also flip between them. So please make sure that you know that they refer to the same thing. Okay. Then electrostatic force and magnetic force are forces that you will deal with and you have already dealt with in a little bit of detail, and you'll deal with them in other chapters in grade 11 and in grade 12. So let's go over some of these forces briefly and remember, I will go over these forces, some of them in more detail in their own videos. Um, so check out the link in the description box below. It's very important to understand these forces, how they work, how to calculate them, how to resolve them into components, before you even decide to approach a Newton's law question. Because if you can't do the basics, you can't do the more complicated stuff. So, our first contact force is the applied force. And it says over here that it is a push or a pull force and it's easier that it causes an object to accelerate. It does. However, we can have an applied force acting on an object that is not accelerating. So an object that's moving at a constant velocity. So for example, we can have an object moving across a surface, there's an applied force pulling the object to the right. There's friction acting to the left, and the object can be moving at a constant velocity. Therefore, it's not accelerating, but it still has an applied force acting on it. So just keep that in mind. And like I said, it's a push or a pull force. So this image over here represents a push force. And this is how you would draw the force diagram. Remember, force diagram is like this, a free body diagram is with the dots. So you can see the force applied is acting to the right because this box is being pushed to the right. So in this little picture it's a a push force, but it can be a pull force. Now take a look at this little diagram over here. Over here, they are indicating that this box is being pushed to the right, so the displacement will be to the right. Over a rough horizontal surface, but the force is acting at an angle, so it's a 21 degree angle relative to the surface. That angle is says 21 degrees. If I had to draw my free body diagram, which I've done for you over here. We've got the normal force acting on the box. Remember that is this force, pushing from the surface upwards onto the object. Because the box is moving to the right, the frictional force acts to the left. We've got the weight force or the gravitational force, and then look at which way the applied force is going. This person is pushing down and to the right. So the arrow must point down and to the right. Note how all the arrows point away from the box. And if you had to do this free body diagram for marks, this would be four marks, and each arrow would be a mark. On the free body diagram that you do for marks, you do not resolve the forces into their components. However, if I were to use this in a Newton's law question, when I do this later on with you, you will see that it is helpful to know how to break up or resolve the applied force into its components. So for example, if applied is going down into the right, so it has a horizontal component going to the right, which is F applied parallel or F applied X because it's along the X axis or horizontal or parallel axis. And F applied Y, which is vertical or along the Y axis or perpendicular. So knowing how to break it up is important. Knowing how to calculate the components is important, but you do not indicate the components on your free body diagram for marks. But that's an applied force really, just a push or a pull. Then we get what we call a tension force. Now a tension force is a force in a rope or a string when it is stretched. And you will often see this in scenario such as this one over here, where I have someone pulling this box, there's tension in that rope. When two objects, for example, A and B, as you can see over here, are connected by a rope or a string and someone is pulling the one object, and then the tension in the rope, so this over here, there's tension in this rope. Causes the other object to therefore be pulled along as well. And then finally, behind me, we can see a pulley situation. There is tension that exists in this string over here, this rope and this rope. So now let's just quickly speak about that. As you can see over here, we've got a tension arrow pointing to the right and a tension arrow pointing to the left. That happens when we have a rope connecting two objects. So if you consider object A and object B over here connected by the string, there's tension in that string. There's a tension force pulling object A to the right, so tension force pulling A to the right, and a tension force pulling B to the left. Think about it, someone is holding this rope and pulling it to the right. That rope between A and B is what's connecting them, it's what's causing A to move to the right. So obviously, the tension for A will be going to the right. That tension force is pulling A to the right. But the tension force for B is actually pulling B slightly to the left. And I know you might say, but ma'am, B is moving to the right because we're pulling it to the right. Yes, but because it's attached to A, the tension is slightly tugging it in the opposite direction. Okay, in the same direction as the frictional force would be pulling it. This is very important for when we do free body diagrams and calculate things at a later stage. Then we've got forces exerted by a surface. So I've got two forces in this instance. I've got the normal force, which is perpendicular to the surface. And then we've got the frictional force, which is parallel to the surface. Now you can see over here, I drew a surface. Normal force, perpendicular, meaning 90 degrees. Frictional force parallel. So here's the surface, frictional force is parallel to the surface. If the object moves to the right, friction opposes the motion, so it acts to the left. Let's first quickly look at the normal force in more detail. So as I mentioned, it is perpendicular to the surface. And I will be going over the normal force in more detail in another video. So click the link in the description box below to find that video. I show you how we calculate the normal force, it's very, very, very important before we tackle Newton's questions that you know how to do this. So the basics very, very important. But for now in this video, I just want you to know that it acts at an angle, at a 90 degree angle, perpendicular. So if I tilt the surface like this. The frictional force is 90 degrees relative to the surface. Here's another picture that maybe shows it a little bit better. We've got the normal force acting at 90 degrees to the surface. Here's the surface. Here's the surface over here. The normal force is at 90 degrees to the surface. Then we've got our other, our other force, which is exerted by a surface, and that is our frictional force. Now, I will go into this in a lot more detail in an up and coming video, but all you need to know for now is that the frictional force is the force that opposes the motion of an object and acts parallel to the surface it is in contact with. So it acts opposite. So if the box is moving to the right, friction goes to the left. If the box is moving to the left, friction goes to the right. And it's always parallel to the surface. And what a lot of students often get wrong is for example, if the box, so here's my box, I'm talking about this box over here. If this box is pulled at an angle, so you see if applied is acting at an angle, they ask me, ma'am, it's friction at an angle or what happens to friction. Friction is always parallel to the surface. So it doesn't matter if your force applied is acting at all weird angles. The box is moving to the right, in this case, there we go, box is moving to the right, so friction is pointing parallel to the surface to the left. Okay. Same thing with when the object is on a plane, if the or slope, if the object is moving up the slope, friction is moving down the slope, parallel to the slope. In future videos, in the video about friction, I will go over the two different types of frictions, how to calculate it. What happens if we change the angle of the slope, how does that affect friction? So don't miss that video, link in the description box. And then we've got our non-contact force, which is our weight. And you, of course, need to know the definition for weight. And weight is the gravitational force of the Earth that it exerts on any object near or on its surface. And the direction for weight is always straight down, straight down to the Earth. So once again, no matter what the surface looks like. So if my surface is like this, here's my object, weight goes straight down to the ground, straight down to the ground, straight down to the Earth. It doesn't, it's not perpendicular to the surface, it's straight down to the Earth. And this is the formula in order to calculate weight, mass times gravity, gravitational acceleration. So mass in kilograms and G on Earth is 9 comma 8 meters per second per second, down. And that's why weight acts down. Again, I will do a video just on weight, where I show you how we resolve weight into its components. This is super, super important in order to answer Newton's laws questions. So you don't want to miss that video. I will see you in
Grade 11 and 12 Forces Physics
Miss Martins Maths and Science
12m 9s2,281 words~12 min read
YouTube auto captions
Transcript source
YouTube auto captions
This transcript was extracted from YouTube's auto-generated caption track. The transcript below is server-rendered so it can be read, searched, cited, and shared without opening the original YouTube player.
Pull quotes
[0:00]It's very, very important that you understand forces before you understand Newton's laws.
[0:00]So this is going to be a quick video introducing you to the various forces that you can expect in upcoming videos.
[0:00]I'm going to be going over the forces in more detail, like normal force, how to calculate it, weight, how to calculate it, friction, static and kinetic friction and how to calculate it.
[0:00]As you should know from grade 9 and grade 10, you get contact versus non-contact forces.
Use this transcript
Related transcript hubs
Watch on YouTube
Share
MORE TRANSCRIPTS


