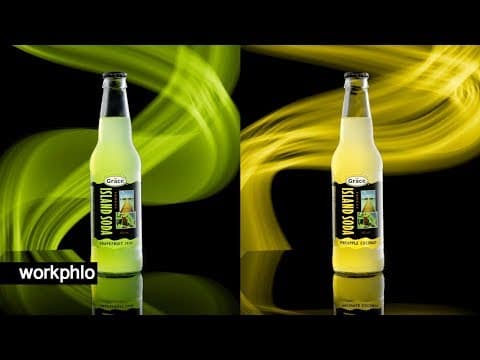
[0:07]Yo, guys, Dustin here. Welcome back to work flow. Stock to have you. Today we're going to shoot uh two bottles with light painting in the background. And this is just a cell phone. That's all you need to light paint the background. Like we'll use one speed light, maybe two speed lights to craft this sort of soft lighting on the face, but super minimalist and this technique's a total drop in the ocean. I mean, get your own LED lights, get a disco ball, get something weird going and you could have a intense result. Post your stuff on our Facebook group. I'd like to see it. Is it too much to ask for you to like the video if you're digging it? Well, I just did, guys. So I'm bringing in a diffuser and this is really simple. So it's just a diffusion panel and I have a clamp to a light white light stand. I'll bring it a nice and snug here. Might even move the bottle a bit, but it'll be fine. That's nice. So the cool thing about this is if you see it from this perspective, it really encapsulates a bit of a vortex you're creating. Like picture from the bottles perspective. There's so much reflective potential and it's so easy to manipulate because everything's static here. Now, you could just shoot a light against this, a constant light, a flashlight even if you're going crazy, but we're going to shoot with a strip box with a speed light in it, which is one of my favorite solutions. If you're subscribed and I hope you are, you'll know what I'm talking about. So I'm going to push this right against it here. It's completely flushed. And actually why don't I cut to a shot from this angle because you'll see you can see the strip box through the diffusion. That's going to be the hard edge of our gradient and as it opens up into space, it's going to get a little softer. I'm at F11, ISO 100, 50 millimeters and I'm going to an eighth power on our 0560 mark 4. Boom, let's do it.
[1:45]That's too dark. I'll tell you that right now. But you can kind of see a nice bottle shot underlying all the darkness. So I'll turn it up, cycle a couple powers here. We'll do a quarter maybe. Half power. You can shoot your wireless through the diffusion material, which is another plus in my opinion. You may think this is still a little dark, but let me show you something kind of funky. If you move your gradient back, it's kind of a tuffer. You get a tuffer one here. Let me explain how. Cuz you're going to get refraction through the other side as you move it back in Z space and that will make the other side glow and sort of create augmented lighting. Let me show you. I like how the right gradient is drifting more towards the exterior. I could move it even more to satisfy a really flush result. But I don't think anyone wants to be like a 3-hour tutorial. So I'll just move along with this. Okay, I'm having a lot of fun here, guys. I got to tell you. Thanks for tuning in. So I love creating a big simple scheme like we have here. It's so reliable. And now we can really fine tune things by acutely focusing on little positions on the bottle. So we have a pretty unidirectional look right now. And do you guys think I should start side tethering like this? It's kind of a nice dynamic. What do you think? Or do you like the full screen better? It's hard to say the full screen's kind of cool too. But yeah, there's something we said for the side tether. I don't know, I'll decide, leave me a comment. So what we're going to do now is bring in my most expensive piece of gear. It is a piece of card from Duralama. And to my display, it looks like someone who has wrote this over on a bike. I don't know, someone's got something explaining to do, but it's still going to work, believe it or not. So what I'm going to do is just bring this really flush in beside our bottle. And that'll kind of duplicate our lighting scheme if you know what I mean. How amazing is that? So it can it creates a really symmetrical lighting scheme. Now, you're not going to get a gradient on the left-hand side significantly, but you're going to get nice reflective power. And you can compose that in or just use it natively like that. It really is bright and there's a beauty in seeing the bright contrast of like the bottle on such a dark background. Very cool. So what I would do in this situation is get a lot of different options. So I'll do some where I'm hovering like literally outside of the shooting table like this. And maybe I'll get a couple options and then I'll float it more interior, get it really close to the shooting surface. Even push my luck a little bit.
[4:14]Nice. Notice I'm getting get nice and low to the shooting surface. That's so the reflection carries all the way down. So what I might do is just grab the speed light out of that strip box and shoot it against the label. I have another speed light handy so I'm going to rock with this. So it's a 0560 again. I put a 3-in-1 gel on this. It's a really nifty item. I'll link in the description. And this is going to focus the light a bit more and it's a cool thing to pick up if you're into speed light shooting exclusively like I pretty much am. And actually we're going to be using this in a lot of future episodes. So if you want to follow along with how we're shooting, go ahead and pick one of these up. I'll link it in the description. So what's nice about this is it'll give us a really focused light just on our label. We'll compare that to a blank shot for you nice folks. And you see the quality of that light. It's so different than if we were to salvage that. See the whites are white, the darks are dark, everything looks crisp and sharp and that's what you want to have up your sleeve when you go into post production. That's your race, not this. You definitely don't need to rock with a grid on your light if you're composte because you have to composte anyway, so that's pretty simple to just mask out. But the grid's useful because what I like to do is pepper a little kiss of light into the back of the bottle after. Right? So there's here, I'll take another blank so we can compare. The difference between this and this because you can bring it into post production and it's a really good way even just with like a radial mask to just inject like I said a little kiss of light in there and just wake everything up and make it seem really commercial, really beautiful. So this exposure in conjunction with the gritty label and this reflective shot and I'll even bring in the original shot. That's a nice little array of items. I would just be delighted to bring in a post production. Well, it's turned out pretty dynamic, guys. I really like how this is going. Hopefully you, uh, share my feelings. So, if you want to get these really dark, stark looks that we had in our final images, it's really important that you either black out your room or you come back at night time. By doing a longer exposure like 5 seconds or 2 seconds, even with a cell phone, we can begin to paint some really cool light behind our bottle, giving it a bit of dynamic energy. With a cell phone, it couldn't be easier. We literally just Google image for a green stripe or a green background. And then we just paint it behind our bottle. It doesn't really matter what image you use because it'll blur over time and becomes so abstract. It's just a great way to invoke some energy into our final composite session. What I really like about this is it's subject to using different colors on the fly. So we could easily pop in a yellow image to switch it out. And then we have a total different flavor for our scheme and literally we could use it for a different flavor. You might notice I brought my light modification away from my bottle here. That does two things like you leave all your lights on and get this in one shot, which is beautifully simple and I like that too. But by separating them, we have more area here to do really wide, wild things on our canvas like this. And then also by isolating the layer, we subject to its own editing. So we can really tweak it and do things that we couldn't do it if it was baked into the whole composition. Plus it's a lot of fun composing and I really enjoy the control it has. So when don't we transition here into Photoshop? We have all our frames here and in terms of light painting, we have a few fun ones here. Uh there's definitely something cool about that. I think I want to do this one or this one. There's something really energetic. That one's tempting, but yeah, I think we're going to go with this one today. It does it does look a little bit dim, so make sure your phone back light timeout is set to like the maximum time. That's a quick tip. I learned that the hard way, but we'll roll forward with this. Now if you're curious about how I'd build up the bottle exposure, let me show you in a few simple steps. So we have our reflection, we have our label light with a grid. You see there's a light here kind of ruin it and we have a back a back exposure back lit. So here's our base frame and what we're going to do for each of these frames is give them a black mask. I do that by holding alt and clicking the mask button and we're going to mask them in selectively. So for this exposure, it's tempting to bring it in everywhere, but what I'm going to do is just skirt it down the left hand side of the bottle. So it's acting like a bit of a edge light and just helps carve that bottle off the background. Yeah, cuts it out like butter and it's really smooth. back in the day I might have settled for something like this, but now just through experience I've learned when things are on a black background, it really pays off to cut them out with a stark white light, so it doesn't end up a little muddy like that looks. So that's a really simple exposure. The label light really do the same thing, given an inverted mask and we'll bring that in just where the label is. So we'll mask that in with a feathered brush. You can get a little sloppy when you bring in mask labels because sometimes it looks sort of sort of moody if they fade out instead of just being completely fulfilled. And make sure to get that reflection, everybody. Beautiful. So that's pretty quick, but we'll keep chugging along here. Here's the top glow. For something like this, I might put it on light mode, just so it doesn't darken anything when it gets introduced. So we will put it on light mode and it's pretty effective as is. It's probably way too bright, but again, we'll give it an inverted mask. Bring out that white brush. And we'll paint it in selectively. And yeah, that does give a bit of energy to the bottle. you don't want to mask it up here obviously and even the stem of the neck. I don't want to mask that in cuz it made it a little foggy. Cool. So that's probably too bright, but since it is isolated, another benefit of composing, we can bring it in selectively, which is nice. I'll probably air on the side of making it a little too bright and then we'll pull it together later with curves. We don't want to make it look too radioactive. Okay, so that's a really simple bottle build up. And you know what I would do above this layer. Because let's take a minute here. I'm on pure black. If I sample this surrounding my bottle, I'm on pure black. And how I did that was I brought in black fabric behind my bottle, which prevented the lights from spilling on it. But also when I import my frames and camera raw, I hold the black node and hit alt and that tells you where your black point is. So once your bottle is surrounded in black pixels, you can confidently make a crude selection around your bottle where it is in black. And this just helps with visualization. Control shift I to invert that selection and alt delete to paste black in your foreground, control D to deselect. So now we can turn all our layers off and on. You see it build up and it's a little more magical when it's sitting in the canvas that it's going to be in. And that's very nice. Okay, so our last steps really to invoke this shot, which is a lot of fun and no selections needed nothing. Cuz see how it's silhouetted here. So if you've been following along recently and quick plug, make sure to subscribe if you haven't because we're covering a lot of stuff using light mode. And what we're going to do is put this whole grouping on light mode. Are you ready? Boom, there it is and it cuts it out seamlessly. And that's a beautiful technique because you can do that with all these exposures. And I mean, look at this. On the fly you can create so many different compositions each one with their funky little flavor and I absolutely love that. It's a lot of fun. As we mentioned earlier, since it is isolated, let's do a quick curves layer we can I'm going to hold alt and clip this effect to this grouping. So now I can affect just the background and I can increase the brightness if needed. And I'll just do that as a quick example. So that's nice. Everything is editable on its own layer and you have a ton of control. And it's just really dynamic. You could combine these layers. Like I could put this on lighting mode itself. And it'll probably not call for it here. Looks a little weird. Yeah, looks all right, looks kind of weird though. But the reason I say this is because you could do something really elegant, like maybe you're trying to do a starburst effect where you have lights coming out from behind the bottle. You can mechanically take a and then paint the best ones together later. So it opens up a lot of possibilities and it like I said, it's a such a cool way to inject abstract energy into your shot. I really do love it. It's fun. So two quick things I would like to show you is the label looks kind of washed out here. So a quick trick I would do is bring out my select color effect. And we're going to go to black. So we just raise these top three values. Right. And again, I'm going to invert this mask and then with my white brush, I'm simply going to paint over the label. See how it just crispens up. It's such a nice thing to do. I love having that in my bag of tricks. Even for stubborn areas like this foggy neck, you know, I could sort of crush that out. And it's really beautiful in the grace logo itself. Also crisp up the word grace. Now what I'll do is do the same thing conversely with white. So let's bring out white and I'll lower these values this time and that's going to crisp up the white. So I'll invert that mask. A lot of inverted masks and I'll crisp up that label right there. And how beautiful is that? It's like a two-second solution and it's super effective in just making sure that everything looks nice and crisp. So it looks like a lot of chaotic stuff is going on, but it's actually I mean it's pretty simple. It's just one exposure. You're bringing that in on light mode and you're just painting in a few detail shots and a few effects to make things look their best. Now you don't have to leave these selective colors on full blast, but it's a nice option to have. You can fade them in and out until it looks respectable. I'm just going to merge everything to make a quick composition point. If you want to cheat your composition a little bit because we're kind of limited by where our Plexiglass ends here. You can do two things. You can shoot with a super wide angle lens, which will distort the outside and make it really large, prospectively. But if you've already shot and you want to cheat it a little bit, I do this all the time. I showed this in my tutorial how to photograph wine with speedlights. I grab everything up to the bottle, control T and then you can drag it out this way. I don't suggest doing this like crazy because it'll be compost pixelated, but within reason you can just sort of cheat it a little bit if you want a wider composition. That's something I do often. I thought to share that tip with you guys, just so you know, there is a bit of leeway, you're not necessarily confined to your original composition. And I might just finally do a curves layer universally on the whole layer and just sort of pull things down. Maybe a little moodier than I had them originally. So pretty simple, guys. I mean, you can do a ton of flavors shooting in this style. And it's a really simple technique. I've seen a few people peppering this technique around our Facebook group where we post, you know, shots we're working on and I love seeing them do it because I already filmed the original portion of this and I was excited to release this to showing how I kind of use this to invoke some energy into bottle shots. But like I said drop in the ocean, so many possibilities here. So I'd love to see what you people all do with this and make sure to post your results in our Facebook group below. I'm dying to see them everybody. Thanks for watching another tutorial. If you want to stick around, I will just say, I think we figured out a way. A pretty good way to tear live into our Facebook group. So we're going to try to pretty soon do some live photo shoots because I think it would be kind of cool. You know, if like we're shooting live, you guys can actually comment like, hey, move that light or I don't like this label or you can give me feedback. We'll have a little back and forth. I think that could be really fun. So hey, make sure to like the video if you have two seconds. I really would appreciate that everybody. And make sure to subscribe to tune in next week because we're releasing a ton of cool stuff here on workflow and I'm really excited to have y'all here. So whatever you're doing, I hope you're having a good one. Hope you have a great week. My name is Dustin. I hope to catch you next time here on work flow and until then, you take care. Ciao for now.